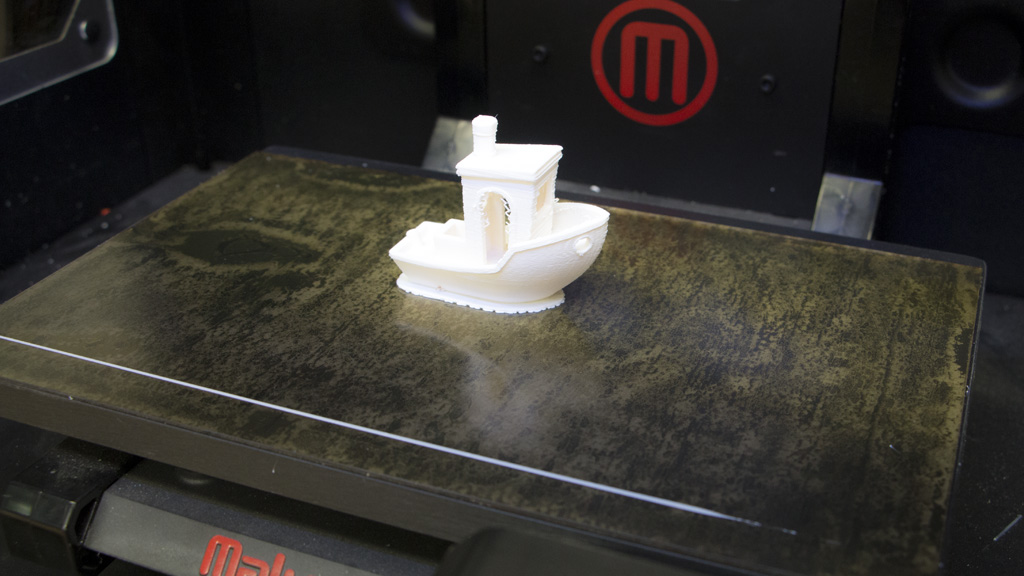
Recently, I was asked to write on a personal printing project since I am an amateur when it comes to 3D printing. The following experience was both interesting and insightful. I tried to go through the steps of printing with as little help as possible to make the experience more authentic.
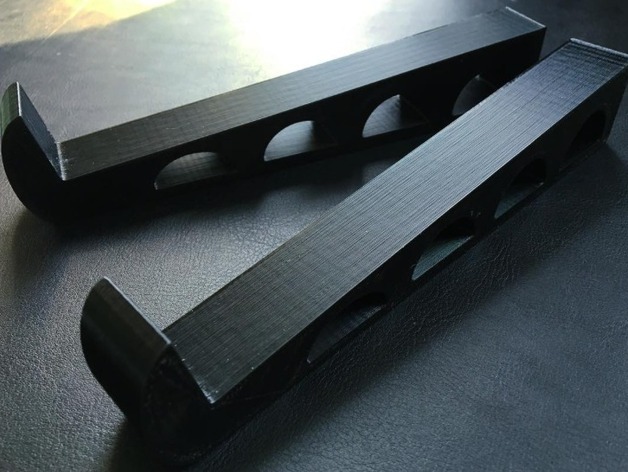
13″ Minimalist Laptop Stand
From: thingiverse.com
Choosing What to Print
The first step in this project was choosing what I wanted to print. I had a few parameters. First, it had to be something practical that I could put to good use. Second, it had to be something simple. This was not because I did not feel up to a more challenging print. I felt that a simpler print would fit the topic better as most people who have just begun printing will not print something extravagant immediately.
With these in mind, I decided to search Thingiverse. Eventually, I came across a four-part laptop stand. This was a little too complex for my parameters, but I liked the idea of a laptop stand. So, I searched for simple laptop stands and found Mostlyfocusedmike’s 13” Minimalist Laptop Stand, which is what I decided to print.
Scaling: 3D Builder
The default 3D object editor that I have on my laptop is 3D Builder. While this may not be the most well-known application, I found that it was easy to use. I measured my laptop and then scaled the model in 3D Builder so that it would fit my own laptop. This mostly involved lengthening the model, as it was designed for a thirteen-inch laptop and mine is a fifteen-inch.
However, as much as 3D Builder was easy to use, I found out that this step was completely extraneous. Later, I had to rescale my model to fit the print space, and I could scale in the slicer I downloaded. In hindsight, 3D Builder is not of much use and is really designed for people who don’t have a printer, as it directs you to another application that allows you to order your 3D print online.
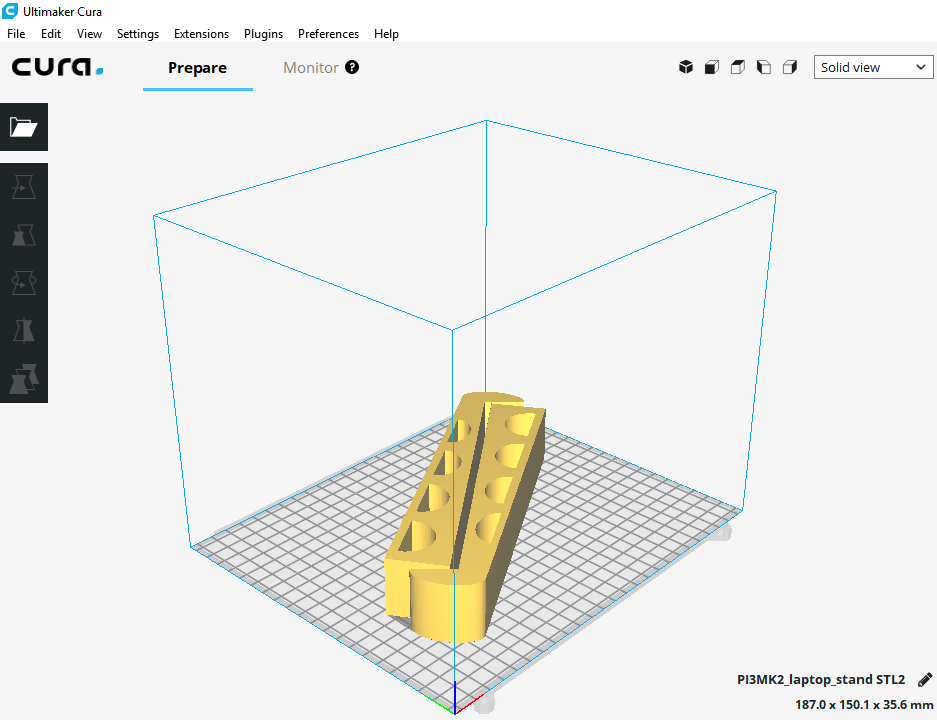
Model One Sliced in Cura
Slicing: Cura
The next step was downloading a slicer to prepare my model for printing. After a few Google searches, I had narrowed the search to just two slicers: Cura and Slic3r. I eventually decided on Cura, because it is geared more towards beginners and has a simpler interface, whereas Slic3r is more advanced.
After downloading Cura, I selected the Makerbot Rep 2 as my printer, since that is the printer that we have the most of here. I discovered that, after selecting the Makerbot, my print was going to be too long for the print space. Therefore, I scaled the model down, closer to its original size.
Around this time, I talked to Eric Falde, a coworker, about my project to see if he had any suggestions. He recommended that I print on the Prusa i3 as the heated bed helps with larger prints. Heeding his advice, I sliced the model for the Prusa and was ready to go.
Printing on the Prusa
This is where I ran into some problems. I tried printing my model on the Prusa, and the model wouldn’t stick to the print bed. The Z-axis wasn’t calibrating like it should have been, and so, the nozzle was too far from the print bed. I talked to Eric again and found out I was using the wrong printer setting in Cura. I had the slicer set to a Prusa i3 printer while the printer I was using was a Prusa i3 Mk2.
This was an easy fix. I switched the printers in Cura and resliced my model. However, I left the scaling of the model the same, despite the larger print area that the Mk2 had to offer.
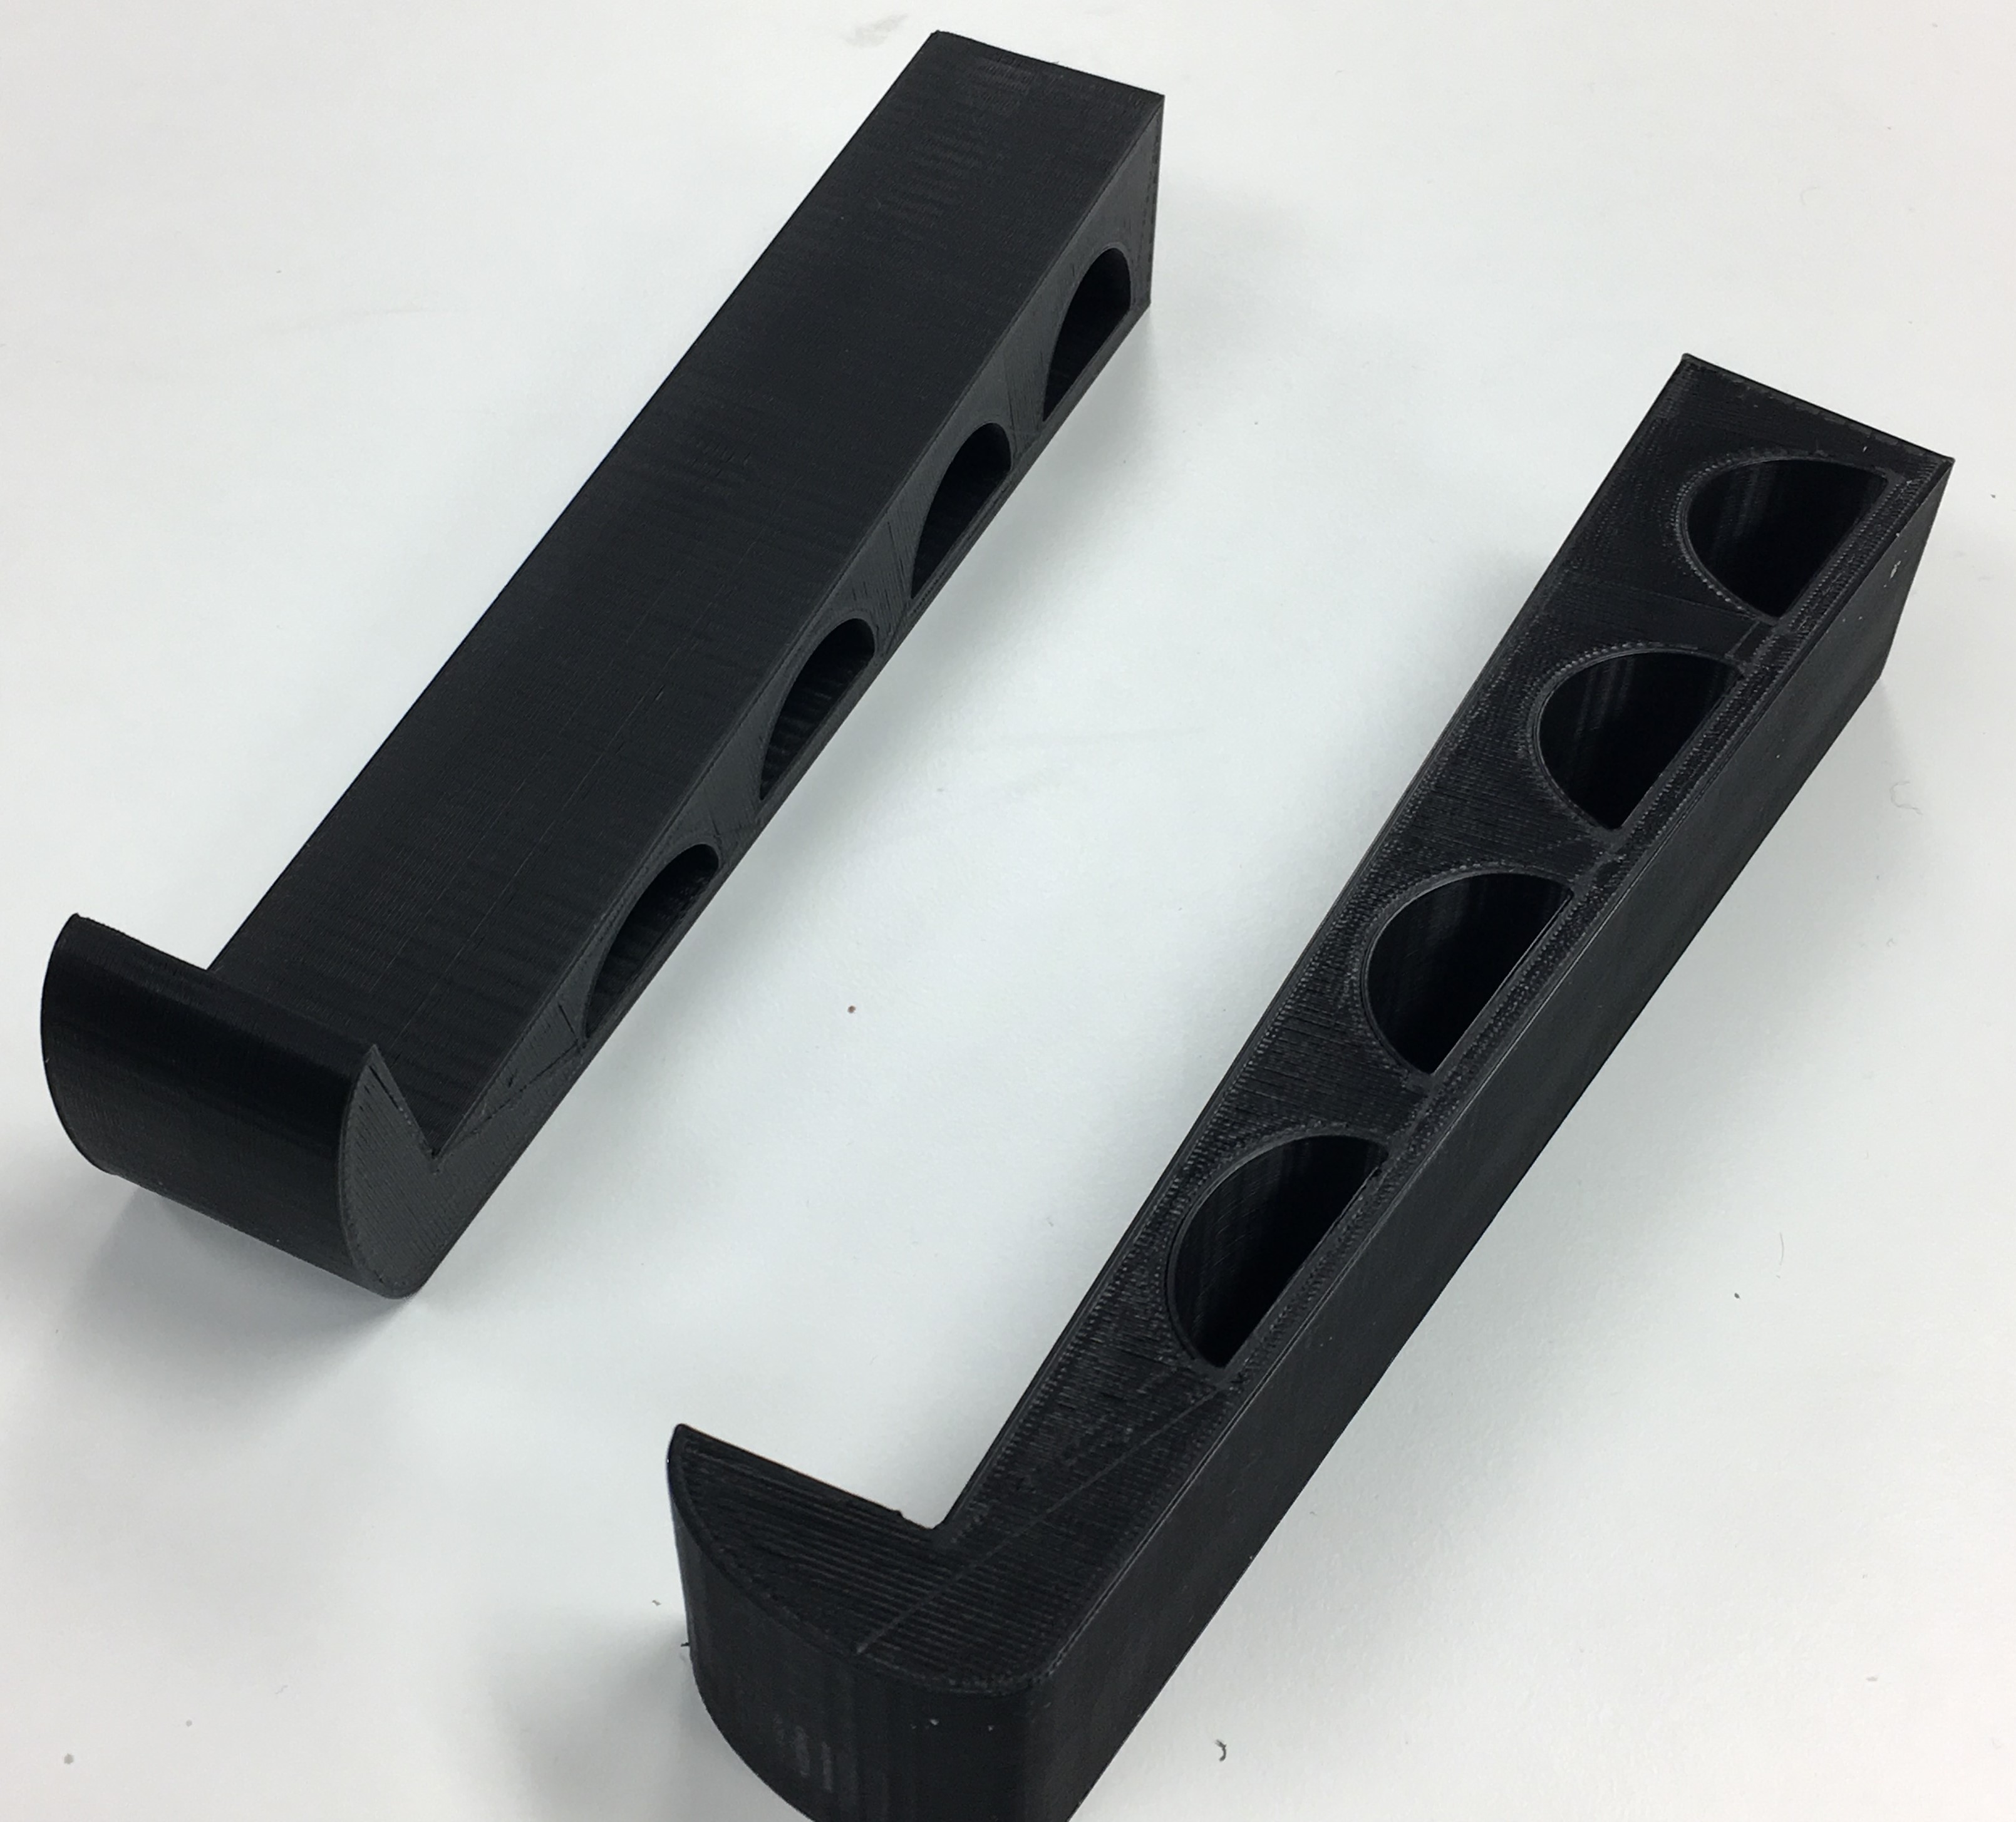
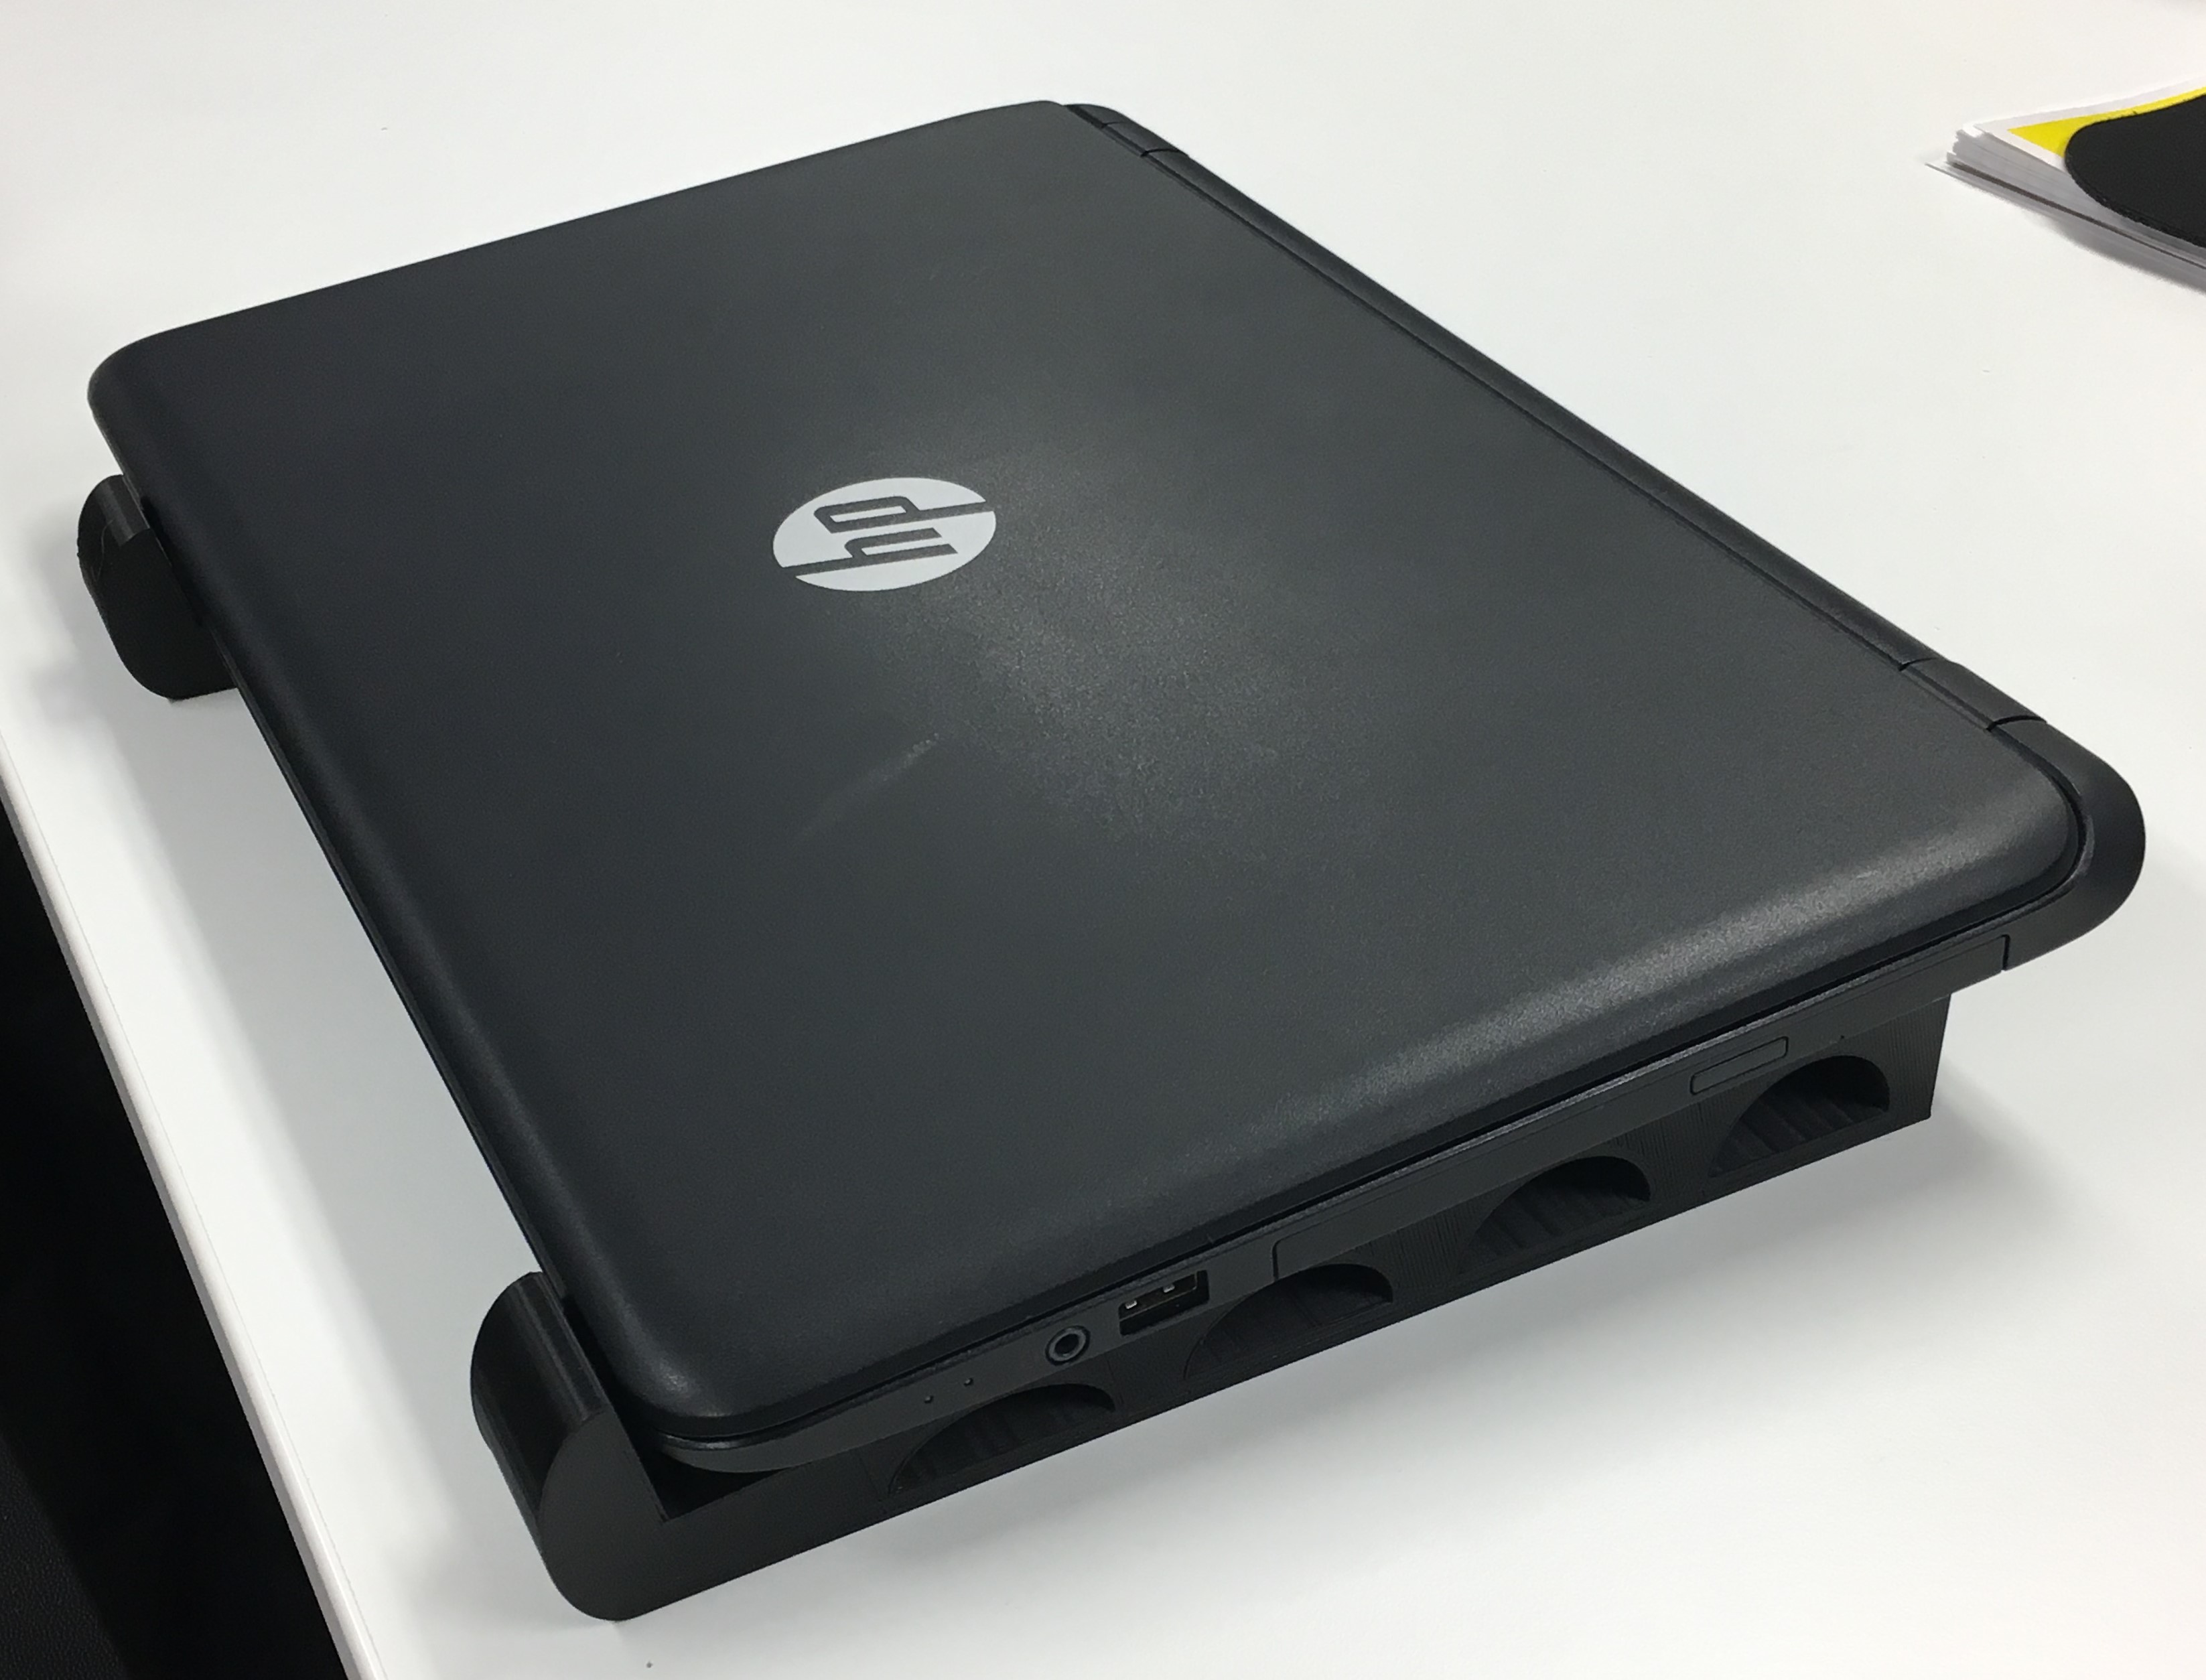
Laptop Stand Model One
The Model
From here, I just had to wait until the model finished printing. It printed very well, and there were no problems that I could see. The next step was to test the stand. With my laptop closed, the stand worked just fine. However, when I opened my laptop, the added weight at the back tipped my laptop off the stand. I realized that, when I scaled the model to fit the print area of the Makerbot Rep 2 and the Prusa i3, I had shortened it so much that it was no longer useful.
Laptop Stand Model Two
Trial Two
Thankfully, the Mk2 had a larger print area I was not fully utilizing. Instead of scaling my model another time, I decided to go back to the original STL file from Thingiverse. I did this because I had scaled my first model three or four times, and I had sometimes only scaled in one direction. The result was a model that was both wider and taller than the original STL file while remaining about the same length.
When preparing my second model, I scaled it lengthwise by twenty percent and arranged it diagonally across the print space. This model had a little more difficulty printing for a reason I still do not know. The first few layers of the print didn’t stick very well, but it still printed. And, the second model worked perfectly.
Overall, I discovered a few things about 3D printing that I had not known about previously. First, there are many things that can go wrong when printing or preparing to print, especially when you do not know much about what you are doing. Second, knowing your printer and its capabilities is essential. And third, it is always good to have someone who knows about printing on hand, whether that be online or in-person.
[sexy_author_bio]


certainly like your web site however you need to take a look at the spelling on quite a few of your posts. Many of them are rife with spelling problems and I find it very bothersome to tell the reality then again I will definitely come back again.
Hello very cool website!! Man .. Beautiful .. Wonderful .. I’ll bookmark your web site and take the feeds also…I’m satisfied to seek out so many helpful information here in the put up, we need develop more techniques in this regard, thank you for sharing.
Everything is very open and very clear explanation of issues. was truly information. Your website is very useful. Thanks for sharing.
You are my intake, I have few blogs and occasionally run out from to brand : (.
I think this internet site has got some rattling wonderful information for everyone. “Only the little people pay taxes.” by Leona Helmsly.
https://stromectol.science/# ivermectin for humans
hello there and thanks in your info – I’ve definitely picked up anything new from right here. I did on the other hand expertise several technical issues using this website, since I experienced to reload the website many occasions previous to I may get it to load correctly. I had been considering if your web hosting is OK? Now not that I’m complaining, however sluggish loading instances instances will very frequently impact your placement in google and could injury your high-quality rating if ads and ***********|advertising|advertising|advertising and *********** with Adwords. Anyway I am including this RSS to my email and could glance out for much more of your respective intriguing content. Make sure you replace this once more soon..
best over the counter cough medicine anthem over the counter catalogue
Excellent web site. A lot of useful information here. I’m sending it to a few friends ans also sharing in delicious. And naturally, thank you to your effort!
over the counter nausea medicine over the counter anti nausea medication
accutane safe Food and Drug Administration FDA does not consider Wellbutrin a drug that can cause physical dependence, abuse, or tolerance
Great weblog right here! Also your site lots up very fast! What web host are you the use of? Can I am getting your associate link for your host? I wish my site loaded up as quickly as yours lol
over the counter ear drops allergy medications over-the-counter
Wow! Thank you! I continuously needed to write on my blog something like that. Can I take a fragment of your post to my site?
is zofran over the counter over the counter flu medicine
Good day! This post couldn’t be written any better! Reading this post reminds me of my old room mate! He always kept talking about this. I will forward this write-up to him. Fairly certain he will have a good read. Many thanks for sharing!
You are a very capable person!
clobetasol cream over the counter over the counter anxiety meds
https://over-the-counter-drug.com/# over the counter birth control
over the counter tapeworm treatment for dogs over the counter appetite suppressant
anti nausea medication over the counter over the counter pill for yeast infection
excellent post, very informative. I’m wondering why the other experts of this sector don’t notice this. You must continue your writing. I’m confident, you have a great readers’ base already!
Very fantastic info can be found on web blog. “It is fast approaching the point where I don’t want to elect anyone stupid enough to want the job.” by Erma Bombeck.
Dear fargo3dprinting.com admin, Your posts are always informative and well-explained.
https://drugsoverthecounter.com/# over the counter blood pressure medicine
I have been exploring for a bit for any high quality articles or weblog posts on this sort of space . Exploring in Yahoo I eventually stumbled upon this web site. Reading this info So i am glad to show that I have an incredibly good uncanny feeling I discovered exactly what I needed. I so much indisputably will make certain to do not fail to remember this site and give it a look on a continuing basis.
I’ve read several good stuff here. Certainly price bookmarking for revisiting. I surprise how much effort you put to create such a excellent informative web site.
I’ll immediately grasp your rss as I can not find your e-mail subscription hyperlink or e-newsletter service. Do you’ve any? Please allow me realize so that I may just subscribe. Thanks.
Enjoyed reading through this, very good stuff, regards.
A powerful share, I simply given this onto a colleague who was doing slightly evaluation on this. And he the truth is purchased me breakfast as a result of I found it for him.. smile. So let me reword that: Thnx for the treat! However yeah Thnkx for spending the time to discuss this, I really feel strongly about it and love studying extra on this topic. If doable, as you grow to be expertise, would you mind updating your weblog with extra particulars? It’s highly helpful for me. Large thumb up for this blog post!
Hello! I simply wish to give a huge thumbs up for the nice info you have right here on this post. I can be coming again to your blog for extra soon.
incrível este conteúdo. Gostei muito. Aproveitem e vejam este site. informações, novidades e muito mais. Não deixem de acessar para aprender mais. Obrigado a todos e até a próxima. 🙂
I liked up to you will receive carried out proper here. The cartoon is tasteful, your authored subject matter stylish. nevertheless, you command get bought an nervousness over that you would like be handing over the following. sick undoubtedly come further until now again since precisely the same just about a lot incessantly inside case you defend this increase.
With havin so much written content do you ever run into any issues of plagorism or copyright infringement? My site has a lot of unique content I’ve either created myself or outsourced but it appears a lot of it is popping it up all over the internet without my permission. Do you know any solutions to help protect against content from being ripped off? I’d genuinely appreciate it.
I genuinely appreciate your work, Great post.
Pretty section of content. I just stumbled upon your website and in accession capital to assert that I acquire in fact enjoyed account your blog posts. Any way I will be subscribing to your feeds and even I achievement you access consistently quickly.
I’m impressed, I must say. Really hardly ever do I encounter a weblog that’s each educative and entertaining, and let me tell you, you’ve got hit the nail on the head. Your concept is excellent; the issue is something that not sufficient people are speaking intelligently about. I am very completely happy that I stumbled throughout this in my seek for one thing referring to this.
Hey There. I found your weblog using msn. That is a really well written article. I will be sure to bookmark it and return to read more of your useful information. Thanks for the post. I’ll definitely return.
Hello my friend! I want to say that this article is awesome, nice written and include almost all significant infos. I’d like to see more posts like this.
I have been browsing online greater than 3 hours lately, but I by no means discovered any attention-grabbing article like yours. It¦s beautiful price sufficient for me. In my view, if all website owners and bloggers made just right content as you probably did, the web shall be a lot more helpful than ever before.
Woah! I’m really enjoying the template/theme of this site. It’s simple, yet effective. A lot of times it’s tough to get that “perfect balance” between superb usability and appearance. I must say you’ve done a great job with this. Also, the blog loads very quick for me on Internet explorer. Excellent Blog!
When I initially commented I clicked the “Notify me when new comments are added” checkbox and now each time a comment is added I get three emails with the same comment. Is there any way you can remove me from that service? Many thanks!
Whats up very nice website!! Guy .. Excellent .. Wonderful .. I’ll bookmark your site and take the feeds also…I’m happy to search out numerous useful info here in the submit, we want develop more strategies on this regard, thanks for sharing.
Wow, awesome blog layout! How long have you been blogging for? you make blogging look easy. The overall look of your web site is great, let alone the content!
Great blog here! Also your web site loads up very fast! What host are you using? Can I get your affiliate link to your host? I wish my website loaded up as quickly as yours lol
I do like the manner in which you have framed this particular concern plus it does give me personally a lot of fodder for thought. On the other hand, coming from just what I have experienced, I basically trust when other feedback stack on that people keep on point and in no way start on a soap box associated with some other news of the day. Yet, thank you for this excellent piece and while I do not necessarily concur with this in totality, I respect your standpoint.
Your place is valueble for me. Thanks!…
I have recently started a website, the information you offer on this web site has helped me tremendously. Thank you for all of your time & work.
Very interesting information!Perfect just what I was searching for!
I don’t usually comment but I gotta admit thankyou for the post on this one : D.
Hey, you used to write fantastic, but the last few posts have been kinda boring… I miss your super writings. Past several posts are just a bit out of track! come on!
Hiya, I am really glad I’ve found this information. Today bloggers publish just about gossips and web and this is actually irritating. A good blog with interesting content, this is what I need. Thanks for keeping this web-site, I’ll be visiting it. Do you do newsletters? Can’t find it.
Very interesting info !Perfect just what I was looking for!
Hello.This post was really remarkable, especially since I was searching for thoughts on this matter last Monday.
Hello.This post was extremely remarkable, particularly because I was looking for thoughts on this issue last Thursday.
Outstanding post, I believe website owners should acquire a lot from this weblog its real user friendly.
Thank you for any other fantastic post. The place else could anyone get that kind of info in such a perfect method of writing? I have a presentation subsequent week, and I am at the search for such information.
Thankyou for this post, I am a big big fan of this web site would like to keep updated.
Of course, what a fantastic blog and instructive posts, I surely will bookmark your blog.Best Regards!
I trust all of you are having an incredible end of the week. I added another rundown. This one is more modest, yet at the same time valuable. I think the following one will be greater.
Hello, you used to write fantastic, but the last several posts have been kinda boring… I miss your great writings. Past several posts are just a little bit out of track! come on!
As a Newbie, I am continuously searching online for articles that can help me. Thank you
I’ve read several good stuff here. Certainly worth bookmarking for revisiting. I surprise how much effort you put to make such a wonderful informative site.
Hey just wanted to give you a quick heads up. The text in your article seem to be running off the screen in Internet explorer. I’m not sure if this is a formatting issue or something to do with web browser compatibility but I figured I’d post to let you know. The style and design look great though! Hope you get the problem fixed soon. Many thanks
I think this is one of the most significant information for me. And i’m cheerful examining your article. Regardless, should remark on hardly any expansive things, The site style is amazing, the articles is genuinely incredible.
I really appreciate this post. I¦ve been looking all over for this! Thank goodness I found it on Bing. You have made my day! Thanks again
hello!,I like your writing very much! share we communicate more about your post on AOL? I require an expert on this area to solve my problem. Maybe that’s you! Looking forward to see you.
I was intrigued accepting that you at whatever point imagined of changing the plan of your site? Its very much made I genuinely like what you’ve got to say. However, no doubt you might somewhat more in the technique for material at some point so individuals could get along with it better.
Thanks for the sensible critique. Me & my neighbor were just preparing to do some research on this. We got a grab a book from our local library but I think I learned more clear from this post. I am very glad to see such great information being shared freely out there.
As a Newbie, I am constantly searching online for articles that can benefit me. Thank you
Some genuinely superb info , Gladiola I observed this. “Traffic signals in New York are just rough guidelines.” by David Letterman.
You are my intake, I have few web logs and occasionally run out from brand :). “‘Tis the most tender part of love, each other to forgive.” by John Sheffield.
Just wanna state that this is invaluable, Thanks for taking your time to write this.
Hello, i feel that i noticed you visited my blog so i got here to “return the choose”.I am attempting to in finding things to enhance my web site!I suppose its good enough to make use of a few of your ideas!!
I’m really impressed with your writing abilities as well as with the structure to your weblog. Is this a paid subject or did you customize it your self? Anyway stay up the excellent quality writing, it is rare to look a nice weblog like this one these days..
Attractive section of content. I just stumbled upon your website and in accession capital to assert that I acquire in fact enjoyed account your blog posts. Any way I will be subscribing to your augment and even I achievement you access consistently rapidly.
hello!,I love your writing very much! percentage we be in contact more about your post on AOL? I need a specialist in this space to unravel my problem. Maybe that’s you! Looking ahead to look you.
It’s perfect time to make some plans for the future and it’s time to be happy. I’ve read this post and if I could I want to suggest you some interesting things or tips. Maybe you could write next articles referring to this article. I wish to read more things about it!
I have been exploring for a little for any high quality articles or blog posts in this kind of house . Exploring in Yahoo I eventually stumbled upon this website. Reading this information So i am glad to show that I have a very good uncanny feeling I found out exactly what I needed. I most without a doubt will make sure to don¦t omit this website and provides it a look on a relentless basis.
I used to be very happy to search out this web-site.I wished to thanks to your time for this wonderful read!! I definitely having fun with every little bit of it and I’ve you bookmarked to check out new stuff you weblog post.
Very well written post. It will be helpful to everyone who employess it, including yours truly :). Keep doing what you are doing – i will definitely read more posts.
Way cool, some valid points! I appreciate you making this article available, the rest of the site is also high quality. Have a fun.
I’ve been surfing online more than 3 hours lately, yet I never discovered any interesting article like yours. It is lovely worth sufficient for me. In my opinion, if all website owners and bloggers made just right content material as you probably did, the internet will likely be much more useful than ever before.
Woh I love your content, saved to my bookmarks! .
As I web-site possessor I believe the content material here is rattling wonderful , appreciate it for your efforts. You should keep it up forever! Good Luck.
We absolutely love your blog and find almost all of your post’s to be precisely what I’m looking for. Do you offer guest writers to write content to suit your needs? I wouldn’t mind writing a post or elaborating on a few of the subjects you write about here. Again, awesome blog!
you’re really a good webmaster. The site loading speed is incredible. It seems that you’re doing any unique trick. Furthermore, The contents are masterpiece. you have done a magnificent job on this topic!
Hello There. I found your blog using msn. That is a very well written article. I’ll be sure to bookmark it and come back to read extra of your useful info. Thank you for the post. I will definitely return.
Thanks for this tremendous post, I am glad I detected this website on yahoo.
Spot on with this write-up, I truly think this web site needs far more consideration. I’ll probably be once more to learn far more, thanks for that info.
I got what you intend,saved to bookmarks, very decent site.
After all, what a great site and informative posts, I will upload inbound link – bookmark this web site? Regards, Reader.
I love it when people come together and share opinions, great blog, keep it up.
Excellent beat ! I wish to apprentice while you amend your site, how can i subscribe for a blog web site? The account aided me a acceptable deal. I had been tiny bit acquainted of this your broadcast offered bright clear concept
This is very attention-grabbing, You’re an overly professional blogger. I have joined your feed and look ahead to searching for more of your fantastic post. Additionally, I have shared your website in my social networks!
Hello I am so glad I found your blog, I really found you by accident, while I was researching on Yahoo for something else, Anyways I am here now and would just like to say thanks a lot for a marvelous post and a all round enjoyable blog (I also love the theme/design), I don’t have time to browse it all at the minute but I have bookmarked it and also added your RSS feeds, so when I have time I will be back to read much more, Please do keep up the excellent work.
What i do not realize is actually how you are now not actually a lot more smartly-appreciated than you may be now. You are so intelligent. You realize thus significantly on the subject of this subject, produced me in my view imagine it from numerous various angles. Its like men and women don’t seem to be involved except it’s something to accomplish with Woman gaga! Your personal stuffs great. At all times take care of it up!
This is a very good tips especially to those new to blogosphere, brief and accurate information… Thanks for sharing this one. A must read article.
I do like the way you have framed this concern and it does give me some fodder for consideration. Nonetheless, because of what precisely I have experienced, I only wish when the remarks stack on that people remain on issue and don’t start on a tirade involving the news du jour. Still, thank you for this exceptional point and although I can not go along with it in totality, I value your perspective.
I haven’t checked in here for a while since I thought it was getting boring, but the last several posts are great quality so I guess I will add you back to my daily bloglist. You deserve it my friend 🙂
Whats up very nice site!! Man .. Beautiful .. Superb .. I’ll bookmark your site and take the feeds additionally?KI am satisfied to seek out so many useful information right here within the put up, we need develop more techniques on this regard, thank you for sharing. . . . . .
Hello. remarkable job. I did not anticipate this. This is a remarkable story. Thanks!
Some really fantastic content on this internet site, thanks for contribution.
Thanks on your marvelous posting! I quite enjoyed reading it, you happen to be a great author.I will make certain to bookmark your blog and will often come back in the future. I want to encourage continue your great writing, have a nice day!
so much good info on here, : D.
Thanks for sharing excellent informations. Your site is so cool. I am impressed by the details that you have on this website. It reveals how nicely you understand this subject. Bookmarked this website page, will come back for more articles. You, my pal, ROCK! I found simply the info I already searched all over the place and simply could not come across. What a great web-site.
Greetings I am so happy I found your web site, I really found you by error, while I was researching on Google for something else, Nonetheless I am here now and would just like to say thank you for a incredible post and a all round exciting blog (I also love the theme/design), I don’t have time to look over it all at the minute but I have saved it and also added your RSS feeds, so when I have time I will be back to read more, Please do keep up the superb work.
You really make it seem so easy with your presentation however I find this matter to be actually one thing which I believe I would never understand. It sort of feels too complicated and extremely vast for me. I’m having a look ahead to your next publish, I will try to get the hang of it!
You are my inhalation, I possess few blogs and rarely run out from post :). “No opera plot can be sensible, for people do not sing when they are feeling sensible.” by W. H. Auden.
Hello there I am so grateful I found your blog page, I really found you by error, while I was looking on Digg for something else, Anyways I am here now and would just like to say many thanks for a incredible post and a all round exciting blog (I also love the theme/design), I don’t have time to look over it all at the minute but I have bookmarked it and also included your RSS feeds, so when I have time I will be back to read much more, Please do keep up the awesome work.
Hi! This post couldn’t be written any better! Reading through this post reminds me of my previous room mate! He always kept talking about this. I will forward this page to him. Fairly certain he will have a good read. Many thanks for sharing!
I in addition to my buddies were found to be going through the great solutions found on the website and so all of a sudden got a horrible suspicion I had not thanked the site owner for them. Those ladies were as a result passionate to read all of them and have now undoubtedly been having fun with those things. Thank you for really being quite thoughtful and then for utilizing some great resources millions of individuals are really desperate to be aware of. Our sincere apologies for not expressing gratitude to sooner.
I see something really special in this internet site.
What i do not realize is in fact how you are no longer actually a lot more smartly-liked than you may be now. You’re so intelligent. You already know therefore significantly in the case of this subject, made me in my opinion imagine it from a lot of various angles. Its like women and men don’t seem to be fascinated until it is something to do with Lady gaga! Your individual stuffs excellent. At all times maintain it up!
I’m usually to running a blog and i actually recognize your content. The article has really peaks my interest. I am going to bookmark your site and maintain checking for new information.
F*ckin’ remarkable issues here. I’m very satisfied to peer your post. Thanks so much and i’m looking ahead to contact you. Will you kindly drop me a mail?
I like this web blog so much, saved to favorites.
Lovely just what I was searching for.Thanks to the author for taking his clock time on this one.
I really appreciate this post. I have been looking all over for this! Thank goodness I found it on Bing. You’ve made my day! Thx again
I enjoy you because of all of the hard work on this web site. Ellie delights in conducting internet research and it is obvious why. Most of us notice all of the powerful way you offer informative strategies by means of your blog and in addition attract participation from other people on the subject matter while our favorite girl is undoubtedly understanding a lot. Enjoy the rest of the new year. You have been conducting a really great job.
I really appreciate this post. I?¦ve been looking everywhere for this! Thank goodness I found it on Bing. You have made my day! Thank you again
I always was concerned in this subject and still am, thanks for posting.
I am glad to be one of several visitants on this outstanding website (:, regards for posting.
I couldn’t resist commenting
Very interesting info!Perfect just what I was searching for!
I am glad to be one of several visitants on this outstanding internet site (:, appreciate it for posting.
Do you mind if I quote a few of your articles as long as I provide credit and sources back to your webpage? My blog is in the very same area of interest as yours and my users would certainly benefit from a lot of the information you present here. Please let me know if this alright with you. Thanks a lot!
Some truly marvellous work on behalf of the owner of this site, absolutely outstanding content material.
Yeah bookmaking this wasn’t a bad determination great post! .
naturally like your website but you need to take a look at the spelling on several of your posts. A number of them are rife with spelling problems and I in finding it very bothersome to inform the truth on the other hand I will surely come back again.
theres a place to meet pretty girls anytime you want for free.
Hey There. I discovered your blog the use of msn. This is an extremely well written article. I will be sure to bookmark it and come back to learn extra of your useful info. Thank you for the post. I’ll certainly return.
I simply wanted to say thanks all over again. I am not sure the things that I could possibly have handled without the entire points provided by you directly on that area of interest. It previously was the challenging problem for me personally, nevertheless being able to see your specialized tactic you resolved the issue made me to cry over delight. I am just grateful for this work as well as believe you find out what an amazing job you’re doing educating other individuals with the aid of your web site. More than likely you have never met all of us.
Terrific work! This is the type of info that should be shared around the web. Shame on the search engines for not positioning this post higher! Come on over and visit my site . Thanks =)
Hi, Neat post. There is a problem with your site in internet explorer, would check this… IE still is the market leader and a big portion of people will miss your wonderful writing because of this problem.
I like the efforts you have put in this, thanks for all the great posts.
You have brought up a very wonderful details, thanks for the post.
I know this if off topic but I’m looking into starting my own blog and was wondering what all is required to get setup? I’m assuming having a blog like yours would cost a pretty penny? I’m not very web savvy so I’m not 100 positive. Any suggestions or advice would be greatly appreciated. Many thanks
Good web site! I really love how it is simple on my eyes and the data are well written. I’m wondering how I might be notified whenever a new post has been made. I’ve subscribed to your RSS which must do the trick! Have a nice day!
Heya i am for the primary time here. I came across this board and I to find It really helpful & it helped me out a lot. I hope to give something back and aid others such as you helped me.
I am curious to find out what blog platform you happen to be working with? I’m experiencing some small security problems with my latest blog and I’d like to find something more risk-free. Do you have any suggestions?
Thanks for helping out, good info. “Our individual lives cannot, generally, be works of art unless the social order is also.” by Charles Horton Cooley.
Привет Друзья!
Искал как сделать текст уникальным, перепробовал массу программ и онлайн сервисов, и все не то((
Друг посоветовал интересный и недорогой софт, может 24/7 пакетно уникализировать тексты, файлы, целые сайты!
Работа идет на базе связки нейросетей переводчиков, что по сути просто и в то же время униклаьно.
Программа называется X-Translator, можно посмотреть тут описание и получить 50% скидку на покупку
https://www.xtranslator.ru/
Не для рекламы, просто решил дать совет, а если Вы знаете софт лучше, прошу отписаться в теме!
Удачи)
The Kibo Code is a product yet to launch.