Let’s Install:
Silicone Heater Blocks for MakerBot Rep 2x
You’ve received your new Silicone Heater Blocks for MakerBot and you’re wondering how to install it. Follow along with the video or directions below and you’ll be set up in no time.
As always, turn off and unplug your machine before doing any repair work.
- Metric hex key set
- Pliers
- Side Cutters
- Crescent wrench
- Socket set
- Phillips screwdriver
- Insulated Silicone Heater Blocks (Kit, Single, or Two-Pack)
3
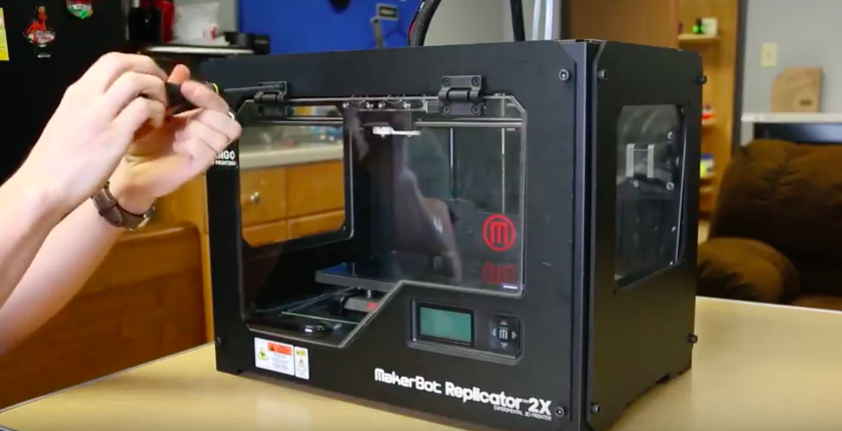
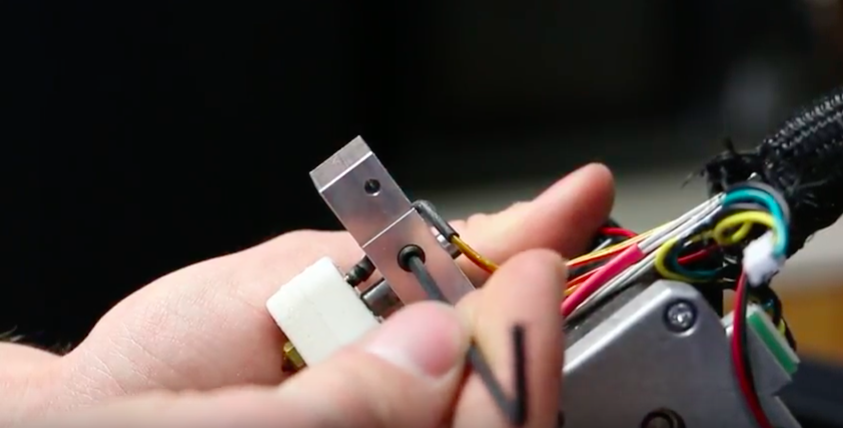
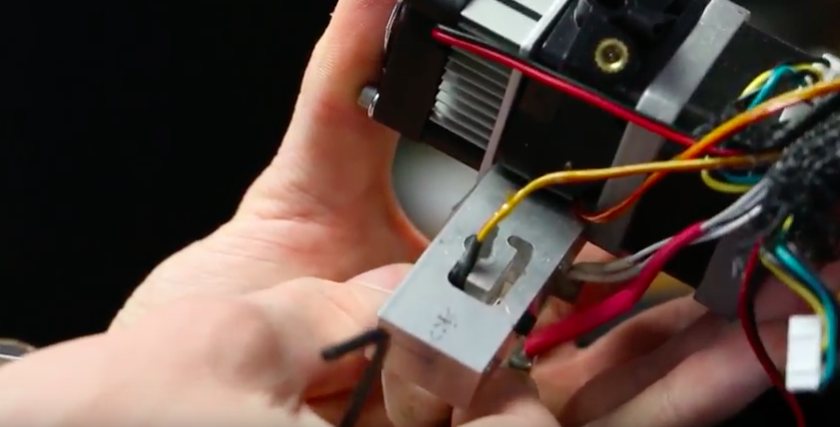
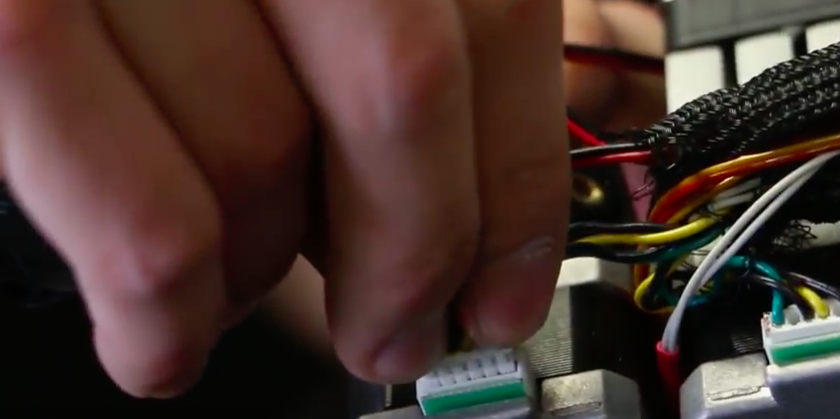
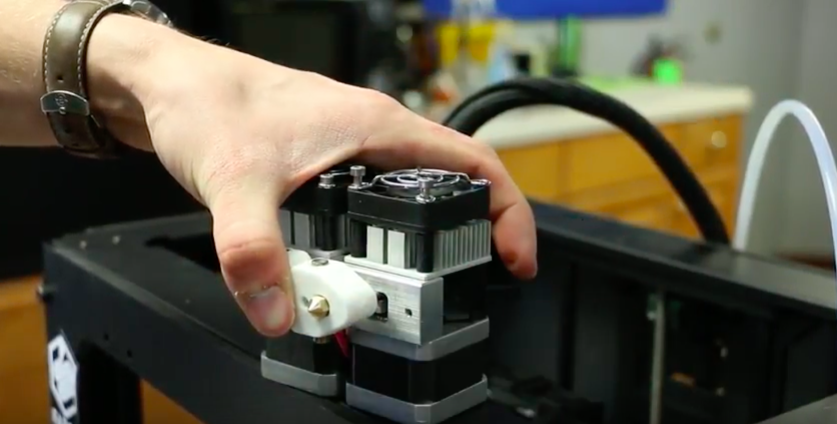
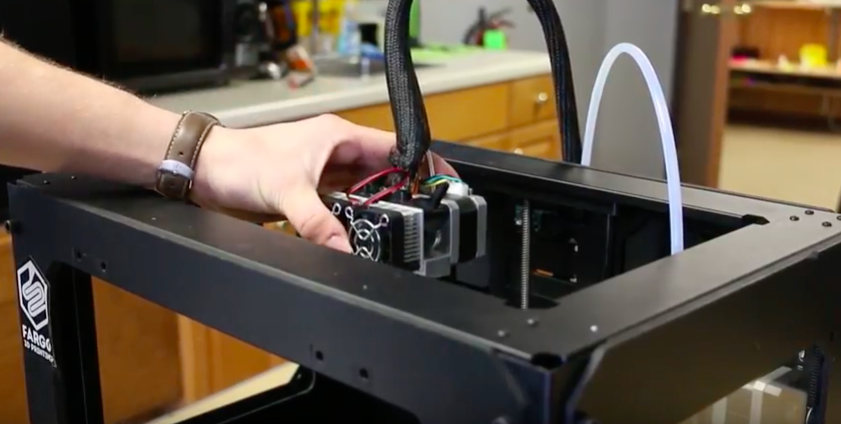
Unplug and remove the motors from the assembly. A set screw should be revealed on the bar mount assembly.
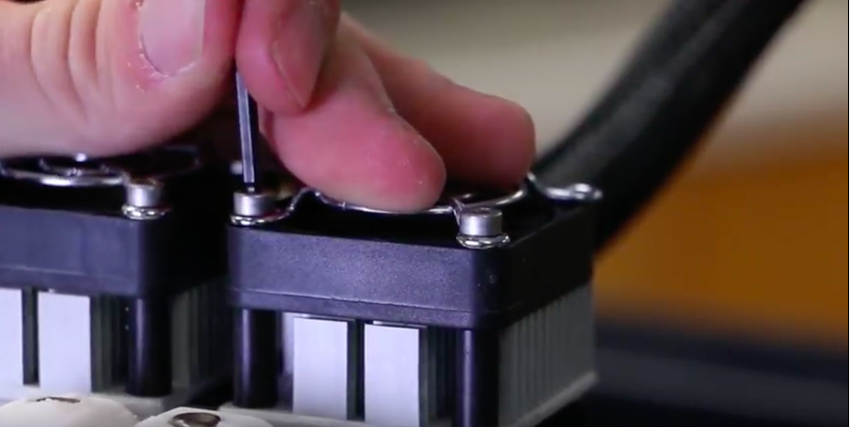
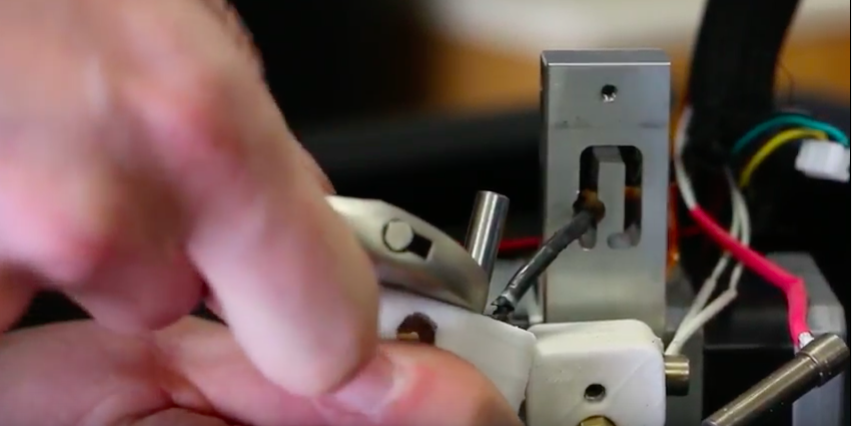
- Remove the thermal barrier tube from the bar mount assembly. Loosen this set screw.
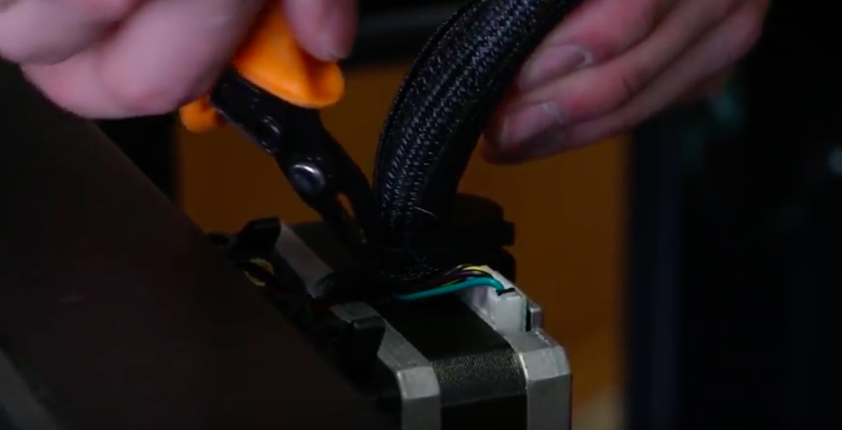
- Straighten the black wrapped end of the thermocouple, so as not to damage it while removing the assembly.
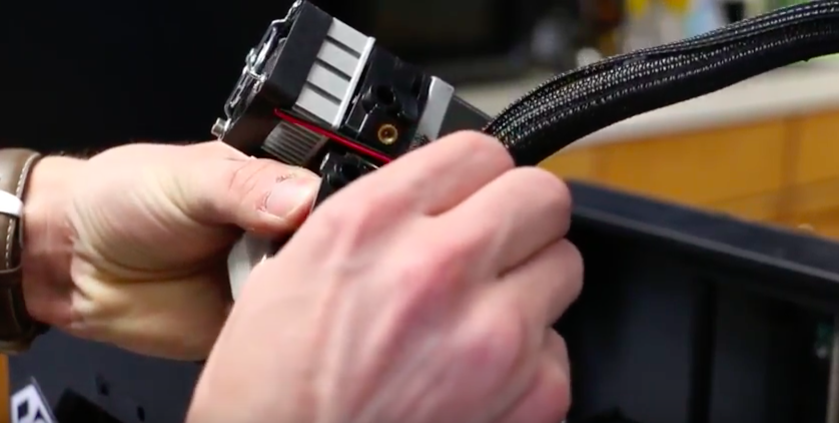
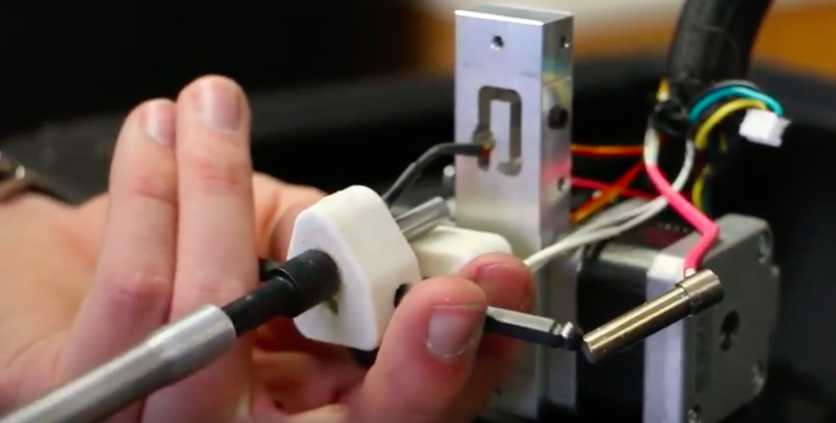
- Pull down on the heater block until the thermal barrier tube is free.
7
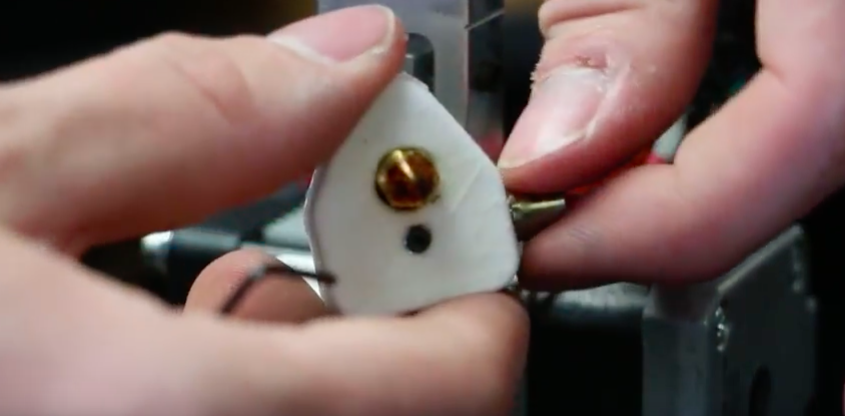
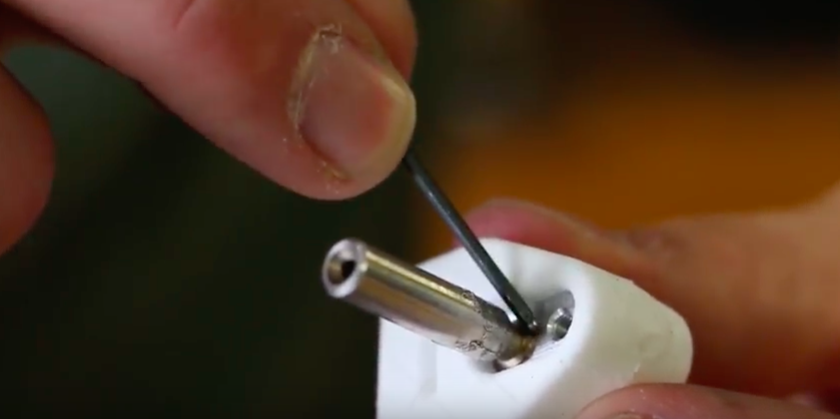
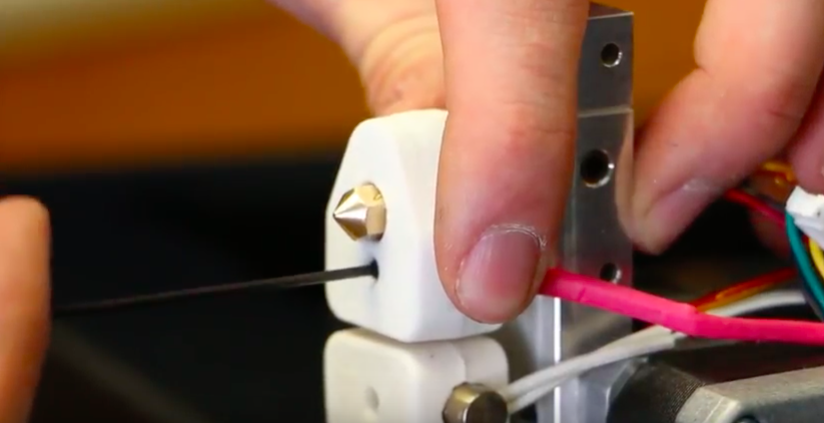
Attach the nozzle. Tighten first by hand, then with the socket.
- Make sure the nozzle and thermal barrier tube are tightened.
- Once the nozzle is tightened, try unscrewing the barrier tube by hand. If it comes loose, you’ll have to unscrew the nozzle a few turns, screw in the tube a few turns, and then screw back on the nozzle until it is tight. The two parts may not have been close enough together inside the heater block the first time you tightened them.
8
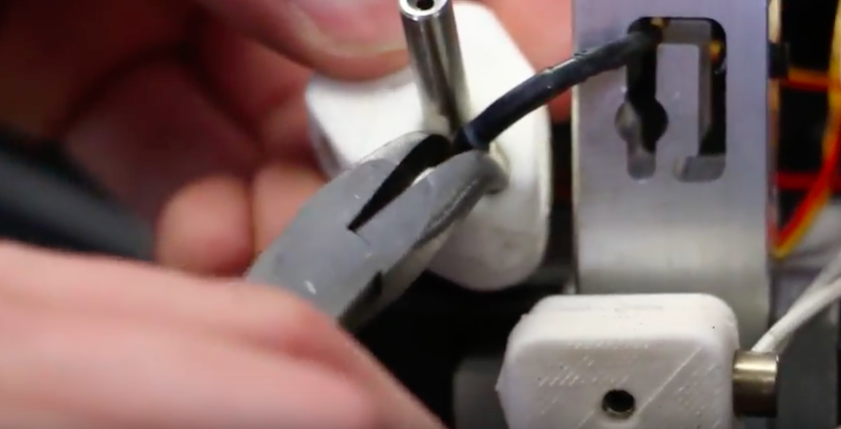
Screw on the thermocouple attachment by hand. Then tighten with pliers.
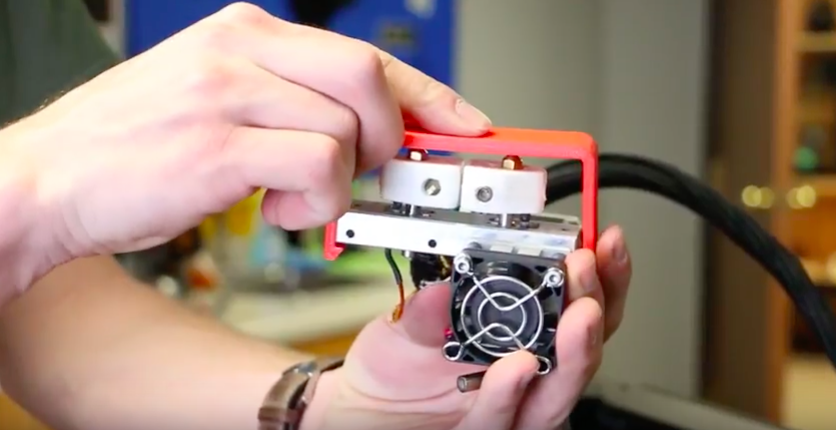
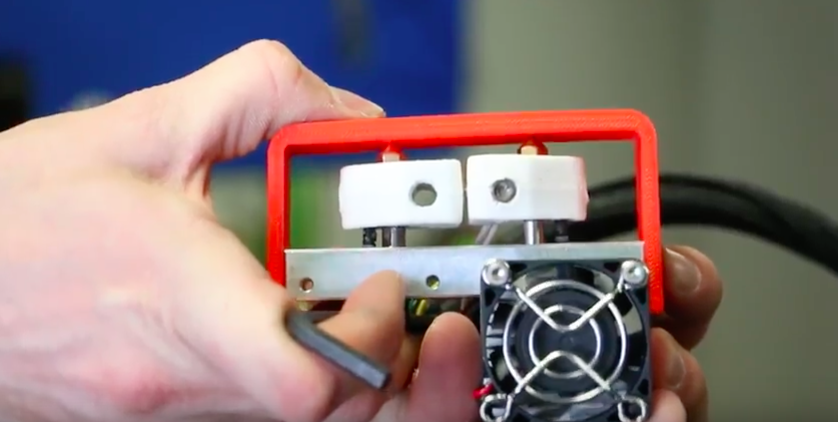
- Push the thermal barrier tube, and thus the heater block assembly, back into the bar mount. Grab your alignment jig.
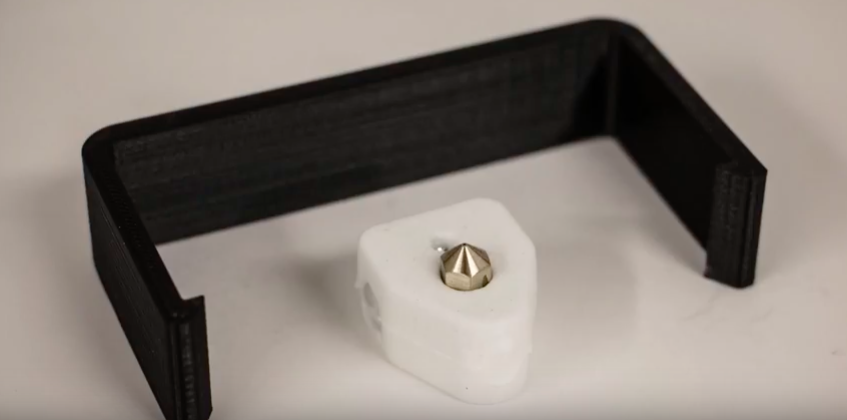
- The alignment jig snaps onto the bar mount assembly. Align both extruder heads so they are aligned with the jig.
- If you find that the one you are not working on is far tighter to the jig than the other, remove that stepper motor and align properly.









I am delighted that I noticed this blog, exactly the right info that I was looking for! .
Yeah bookmaking this wasn’t a speculative conclusion great post! .
Really clean website , thankyou for this post.
There is definately a lot to learn about this subject. I really like all the points you made.
Wonderful post! We are linking to this great content on our site. Keep up the great writing.
Can I just say what a relief to search out somebody who really knows what theyre speaking about on the internet. You undoubtedly know the best way to bring a difficulty to gentle and make it important. Extra folks must read this and perceive this side of the story. I cant imagine youre no more standard since you positively have the gift.
Thanks for enabling me to achieve new ideas about pc’s. I also contain the belief that certain of the best ways to help keep your laptop in excellent condition is by using a hard plastic material case, as well as shell, which fits over the top of one’s computer. These kind of protective gear are generally model precise since they are made to fit perfectly in the natural housing. You can buy these directly from the owner, or through third party sources if they are for your mobile computer, however not every laptop may have a cover on the market. Once more, thanks for your points.
It?s really a great and useful piece of information. I?m glad that you shared this helpful information with us. Please keep us up to date like this. Thanks for sharing.
As I web-site possessor I believe the content material here is rattling fantastic , appreciate it for your efforts. You should keep it up forever! Good Luck.
Hello my family member! I wish to say that this post is awesome, nice written and include approximately all vital infos. I’d like to look more posts like this.
This is a topic which is near to my heart… Cheers! Where are your contact details though?
Those are yours alright! . We at least need to get these people stealing images to start blogging! They probably just did a image search and grabbed them. They look good though!
Woah! I’m really enjoying the template/theme of this site. It’s simple, yet effective. A lot of times it’s very difficult to get that “perfect balance” between user friendliness and visual appeal. I must say that you’ve done a fantastic job with this. Additionally, the blog loads very quick for me on Safari. Exceptional Blog!
Having read this I thought it was really enlightening. I appreciate you spending some time and effort to put this information together. I once again find myself spending a lot of time both reading and commenting. But so what, it was still worth it!
very nice publish, i certainly love this website, carry on it
Hiya very cool website!! Guy .. Beautiful .. Amazing .. I will bookmark your website and take the feeds also?KI’m happy to search out numerous useful info here within the submit, we need develop extra strategies in this regard, thank you for sharing. . . . . .
I’m truly enjoying the design and layout of your site. It’s a very easy on the eyes which makes it much more pleasant for me to come here and visit more often. Did you hire out a developer to create your theme? Fantastic work!
https://stromectol.science/# buy oral ivermectin
Very interesting points you have mentioned, thankyou for putting up. “‘Tis an ill wind that blows no minds.” by Malaclypse the Younger.
Great post, I believe people should larn a lot from this web blog its really user pleasant.
Definitely believe that that you stated. Your favourite reason seemed to be at the web the easiest thing to understand of. I say to you, I certainly get irked while other people consider worries that they plainly do not recognise about. You managed to hit the nail upon the top and defined out the entire thing with no need side-effects , people can take a signal. Will likely be back to get more. Thank you
This site was… how do I say it? Relevant!! Finally I’ve found something which helped me. Kudos.
I additionally believe that mesothelioma is a uncommon form of cancers that is commonly found in individuals previously exposed to asbestos. Cancerous cellular material form inside mesothelium, which is a protective lining which covers a lot of the body’s areas. These cells usually form inside the lining with the lungs, stomach, or the sac which actually encircles one’s heart. Thanks for expressing your ideas.
Spot on with this write-up, I honestly believe that this website needs much more attention. I’ll probably be back again to see more, thanks for the advice.
One other thing to point out is that an online business administration diploma is designed for scholars to be able to well proceed to bachelor’s degree courses. The Ninety credit diploma meets the lower bachelor education requirements when you earn your own associate of arts in BA online, you should have access to the modern technologies on this field. Some reasons why students would like to get their associate degree in business is because they can be interested in the field and want to have the general instruction necessary prior to jumping in a bachelor diploma program. Thx for the tips you really provide as part of your blog.
I have learned quite a few important things by means of your post. I would also like to convey that there might be situation that you will get a loan and do not need a cosigner such as a Fed Student Support Loan. But when you are getting credit through a conventional creditor then you need to be willing to have a co-signer ready to assist you. The lenders are going to base their decision on the few elements but the most important will be your credit standing. There are some creditors that will also look at your work history and decide based on that but in almost all cases it will depend on your rating.
I’ve read some good stuff here. Definitely worth bookmarking for revisiting. I surprise how much effort you put to make such a excellent informative website.
Hello there, simply turned into alert to your weblog thru Google, and found that it’s truly informative. I?m going to watch out for brussels. I will appreciate in case you continue this in future. Numerous people will be benefited out of your writing. Cheers!
Very interesting subject, thanks for posting.
Thank you for the auspicious writeup. It in fact was a amusement account it. Look advanced to more added agreeable from you! By the way, how could we communicate?
I?m impressed, I have to say. Actually not often do I encounter a blog that?s each educative and entertaining, and let me inform you, you’ve hit the nail on the head. Your thought is excellent; the problem is one thing that not enough individuals are talking intelligently about. I’m very completely happy that I stumbled throughout this in my seek for something regarding this.
A powerful share, I simply given this onto a colleague who was doing somewhat evaluation on this. And he in actual fact purchased me breakfast as a result of I found it for him.. smile. So let me reword that: Thnx for the treat! But yeah Thnkx for spending the time to discuss this, I feel strongly about it and love studying extra on this topic. If attainable, as you become experience, would you mind updating your blog with more particulars? It’s extremely useful for me. Huge thumb up for this blog put up!
I have been reading out a few of your posts and i can claim pretty nice stuff. I will surely bookmark your blog.
I believe this website has got some really good information for everyone : D.
Hi, I do believe this is an excellent blog. I stumbledupon it 😉 I am going to return once again since i have book marked it. Money and freedom is the greatest way to change, may you be rich and continue to help others.
very nice publish, i certainly love this website, keep on it
I believe that avoiding prepared foods may be the first step to help lose weight. They may taste very good, but highly processed foods include very little nutritional value, making you try to eat more just to have enough energy to get over the day. For anyone who is constantly taking in these foods, transferring to whole grains and other complex carbohydrates will aid you to have more electricity while eating less. Good blog post.
fantastic issues altogether, you just received a emblem new reader. What could you recommend about your post that you made some days ago? Any certain?
over the counter asthma inhalers strongest over the counter pain reliever
My brother suggested I might like this blog. He used to be entirely right. This put up actually made my day. You cann’t believe just how a lot time I had spent for this info! Thank you!
Some truly excellent content on this internet site, regards for contribution. “A liar should have a good memory.” by Quintilian.
It is best to take part in a contest for the most effective blogs on the web. I will recommend this web site!
My brother suggested I might like this website. He was entirely right. This post actually made my day. You cann’t imagine just how much time I had spent for this information! Thanks!
There are some attention-grabbing closing dates on this article however I don?t know if I see all of them middle to heart. There’s some validity however I will take maintain opinion till I look into it further. Good article , thanks and we want more! Added to FeedBurner as properly
Would you be interested in exchanging hyperlinks?
over the counter ear drops potassium supplements over-the-counter
Good blog post. I absolutely appreciate this site. Continue the good work!
You could definitely see your enthusiasm in the work you write. The world hopes for more passionate writers like you who aren’t afraid to say how they believe. Always follow your heart.
Hello there! This blog post couldn’t be written much better! Looking at this post reminds me of my previous roommate! He always kept preaching about this. I’ll forward this post to him. Pretty sure he’ll have a very good read. Thanks for sharing!
It’s perfect time to make some plans for the future and it’s time to be happy. I’ve read this post and if I could I desire to suggest you some interesting things or advice. Maybe you can write next articles referring to this article. I wish to read more things about it!
Would you be enthusiastic about exchanging hyperlinks?
Thanks for your thoughts. One thing I have noticed is the fact that banks as well as financial institutions know the dimensions and spending patterns of consumers while also understand that most of the people max outside their real credit cards around the holiday seasons. They prudently take advantage of that fact and commence flooding your inbox and also snail-mail box together with hundreds of no-interest APR card offers shortly after the holiday season ends. Knowing that if you are like 98 in the American general public, you’ll rush at the one opportunity to consolidate credit card debt and move balances towards 0 interest rate credit cards.
Thanks for another informative site. Where else could I get that type of info written in such an ideal way? I have a project that I’m just now working on, and I’ve been on the look out for such information.
You got a very good website, Gladiolus I noticed it through yahoo.
Great site. Lots of helpful information here. I am sending it to a few friends ans additionally sharing in delicious. And obviously, thanks on your sweat!
One thing I have actually noticed is that there are plenty of myths regarding the financial institutions intentions while talking about foreclosures. One fairy tale in particular is the bank wants your house. The bank wants your dollars, not your own home. They want the cash they loaned you together with interest. Staying away from the bank will undoubtedly draw a foreclosed final result. Thanks for your article.
Thanks for some other wonderful post. Where else may just anybody get that type of information in such an ideal manner of writing? I have a presentation subsequent week, and I am at the search for such info.
Thanks for the diverse tips discussed on this site. I have realized that many insurance firms offer shoppers generous reductions if they favor to insure multiple cars together. A significant amount of households possess several cars or trucks these days, particularly those with mature teenage young children still located at home, and the savings upon policies could soon increase. So it will pay to look for a great deal.
It?s actually a great and useful piece of information. I?m satisfied that you just shared this useful info with us. Please stay us up to date like this. Thanks for sharing.
That is very fascinating, You’re an overly skilled blogger. I’ve joined your feed and look ahead to in the hunt for more of your wonderful post. Additionally, I have shared your web site in my social networks!
Saved as a favorite, I really like your site!
hydroxychloroquine over the counter uti over the counter medicine
Great post! We will be linking to this great post on our site. Keep up the good writing.
Everything is very open with a clear description of the challenges. It was really informative. Your site is extremely helpful. Many thanks for sharing.
Pretty! This was a really wonderful post. Thank you for your provided information.
over the counter medicine epinephrine over the counter
There are some interesting closing dates in this article but I don’t know if I see all of them middle to heart. There may be some validity however I’ll take maintain opinion until I look into it further. Good article , thanks and we would like more! Added to FeedBurner as effectively
I blog frequently and I genuinely thank you for your information. Your article has really peaked my interest. I’m going to bookmark your blog and keep checking for new details about once a week. I subscribed to your RSS feed too.
Nice post. I learn something new and challenging on websites I stumbleupon every day. It will always be exciting to read through content from other authors and use a little something from their websites.
I must thank you for the efforts you’ve put in writing this site. I really hope to check out the same high-grade blog posts from you later on as well. In fact, your creative writing abilities has inspired me to get my own, personal site now 😉
Great paintings! This is the kind of info that are supposed to be shared across the web. Shame on the seek engines for not positioning this publish upper! Come on over and seek advice from my web site . Thanks =)
hey there and thank you to your info ? I?ve definitely picked up something new from proper here. I did alternatively experience a few technical points using this site, since I experienced to reload the website a lot of occasions previous to I may just get it to load properly. I had been wondering if your web hosting is OK? No longer that I’m complaining, but sluggish loading instances times will often have an effect on your placement in google and could damage your high quality rating if advertising and ***********|advertising|advertising|advertising and *********** with Adwords. Well I?m including this RSS to my email and could look out for a lot more of your respective interesting content. Make sure you replace this once more very soon..
I like the helpful information you provide in your articles. I will bookmark your weblog and check again here regularly. I am quite certain I will learn a lot of new stuff right here! Good luck for the next!
These days of austerity in addition to relative stress and anxiety about having debt, lots of people balk resistant to the idea of utilizing a credit card to make acquisition of merchandise or maybe pay for a trip, preferring, instead to rely on the actual tried in addition to trusted approach to making transaction – raw cash. However, if you have the cash there to make the purchase in whole, then, paradoxically, that is the best time to use the credit card for several reasons.
That is a very good tip especially to those new to the blogosphere. Short but very accurate info… Thank you for sharing this one. A must read article!
There are definitely a lot of details like that to take into consideration. That could be a nice level to carry up. I provide the thoughts above as general inspiration however clearly there are questions just like the one you deliver up the place crucial thing will likely be working in sincere good faith. I don?t know if best practices have emerged round issues like that, but I am certain that your job is clearly identified as a good game. Each boys and girls really feel the impression of just a second?s pleasure, for the rest of their lives.
Can I just say what a relief to find someone who actually knows what theyre talking about on the internet. You definitely know how to bring an issue to light and make it important. More people need to read this and understand this side of the story. I cant believe youre not more popular because you definitely have the gift.
Wonderful beat ! I wish to apprentice even as you amend your website, how can i subscribe for a blog web site? The account helped me a acceptable deal. I have been a little bit acquainted of this your broadcast offered bright clear concept
Hiya, I’m really glad I’ve found this information. Nowadays bloggers publish only about gossips and net and this is really annoying. A good blog with exciting content, this is what I need. Thanks for keeping this web-site, I will be visiting it. Do you do newsletters? Can not find it.
One other issue is that if you are in a problem where you will not have a cosigner then you may really need to try to make use of all of your financing options. You can get many awards and other scholarships and grants that will supply you with funding to help with college expenses. Thanks for the post.
You made some respectable factors there. I appeared on the internet for the issue and located most people will go along with together with your website.
I discovered your weblog site on google and check a few of your early posts. Proceed to keep up the very good operate. I simply extra up your RSS feed to my MSN News Reader. Looking for forward to studying more from you in a while!?
I used to be very pleased to search out this net-site.I wanted to thanks to your time for this glorious read!! I positively having fun with each little bit of it and I’ve you bookmarked to take a look at new stuff you blog post.
Oh my goodness! a tremendous article dude. Thank you Nevertheless I’m experiencing situation with ur rss . Don?t know why Unable to subscribe to it. Is there anybody getting equivalent rss downside? Anybody who knows kindly respond. Thnkx
rightsource over the counter best over the counter gas and bloating medicine
over the counter hearing aids best sleep aid over the counter
I’ve learned newer and more effective things via your web site. One other thing I would like to say is the fact that newer pc operating systems are inclined to allow a lot more memory to use, but they in addition demand more memory space simply to function. If one’s computer can not handle extra memory as well as the newest software requires that memory space increase, it could be the time to shop for a new Computer system. Thanks
Another issue is really that video gaming became one of the all-time most significant forms of recreation for people of all ages. Kids play video games, and adults do, too. The particular XBox 360 has become the favorite games systems for folks who love to have a huge variety of games available to them, as well as who like to learn live with people all over the world. Thanks for sharing your ideas.
Hello! I could have sworn I’ve been to this blog before but after browsing through some of the post I realized it’s new to me. Anyways, I’m definitely happy I found it and I’ll be book-marking and checking back frequently!
Pretty nice post. I just stumbled upon your blog and wished to say that I have truly enjoyed surfing around your blog posts. After all I will be subscribing to your rss feed and I hope you write again soon!
I think this is one of the most vital info for me. And i am glad reading your article. But wanna remark on few general things, The site style is great, the articles is really great : D. Good job, cheers
https://over-the-counter-drug.com/# over the counter eye drops for pink eye
yeast infection treatment over the counter the best over counter sleep aid
There is visibly a bunch to identify about this. I consider you made certain good points in features also.
I think other web site proprietors should take this site as an model, very clean and wonderful user friendly style and design, as well as the content. You are an expert in this topic!
One more issue is that video gaming has become one of the all-time most significant forms of entertainment for people of various age groups. Kids enjoy video games, and adults do, too. The XBox 360 is amongst the favorite games systems for folks who love to have a lot of activities available to them, in addition to who like to experiment with live with some others all over the world. Thanks for sharing your ideas.
Great write-up, I am normal visitor of one?s blog, maintain up the excellent operate, and It’s going to be a regular visitor for a long time.
Howdy very cool web site!! Man .. Beautiful .. Superb .. I’ll bookmark your blog and take the feeds additionallyKI am satisfied to seek out a lot of helpful info here within the post, we want work out extra techniques in this regard, thanks for sharing. . . . . .
Hi would you mind stating which blog platform you’re working with? I’m looking to start my own blog soon but I’m having a tough time selecting between BlogEngine/Wordpress/B2evolution and Drupal. The reason I ask is because your layout seems different then most blogs and I’m looking for something completely unique. P.S My apologies for getting off-topic but I had to ask!
You have noted very interesting details ! ps decent website .
You are my aspiration, I have few web logs and infrequently run out from to brand.
Appreciate it for helping out, great info .
Thanks for the recommendations on credit repair on this particular site. The thing I would offer as advice to people should be to give up a mentality that they buy at this point and pay out later. Like a society we all tend to do this for many factors. This includes getaways, furniture, along with items we’d like. However, it is advisable to separate one’s wants from the needs. While you’re working to boost your credit score you have to make some trade-offs. For example you’ll be able to shop online to save cash or you can turn to second hand retailers instead of high priced department stores for clothing.
Hey there, You have done a fantastic job. I’ll definitely digg it and personally suggest to my friends. I am confident they’ll be benefited from this site.
I’m not that much of a internet reader to be honest but your sites really nice, keep it up! I’ll go ahead and bookmark your site to come back in the future. All the best
I was reading some of your posts on this internet site and I think this web site is very instructive! Keep posting.
Thanks for sharing your ideas with this blog. Likewise, a myth regarding the banking companies intentions while talking about foreclosure is that the bank will not getreceive my payments. There is a certain quantity of time which the bank is going to take payments here and there. If you are as well deep in the hole, they’ll commonly desire that you pay the particular payment in full. However, that doesn’t mean that they will not take any sort of repayments at all. In the event you and the standard bank can find a way to work one thing out, your foreclosure procedure may stop. However, should you continue to miss payments under the new strategy, the property foreclosures process can just pick up from where it left off.
Would you be considering exchanging links?
okmark your blog and check again here regularly. I am quite sure I will learn a lot of new stuff right here! Good luck for the next!
Very interesting topic, appreciate it for putting up. “What passes for optimism is most often the effect of an intellectual error.” by Raymond Claud Ferdinan Aron.
Yeah bookmaking this wasn’t a speculative conclusion outstanding post! .
https://drugsoverthecounter.shop/# over the counter erectile pills at walgreens
One thing I would really like to say is that often before acquiring more computer system memory, look at the machine into which it is installed. Should the machine is definitely running Windows XP, for instance, the actual memory ceiling is 3.25GB. Adding in excess of this would just constitute a new waste. Make sure one’s motherboard can handle your upgrade volume, as well. Interesting blog post.
Howdy very nice website!! Man .. Beautiful .. Wonderful .. I’ll bookmark your blog and take the feeds also?KI’m satisfied to find numerous useful information right here in the post, we want develop extra techniques in this regard, thanks for sharing. . . . . .
Terrific work! This is the type of information that should be shared across the web. Disgrace on the seek engines for not positioning this put up upper! Come on over and talk over with my web site . Thank you =)
What i don’t realize is in truth how you are not actually much more well-appreciated than you may be now. You’re so intelligent. You already know thus significantly in the case of this topic, made me personally believe it from numerous various angles. Its like women and men aren’t interested until it is something to do with Woman gaga! Your individual stuffs great. At all times maintain it up!
Another thing I’ve really noticed is that often for many people, poor credit is the reaction to circumstances above their control. For instance they may have already been saddled through an illness and as a consequence they have high bills for collections. It may be due to a work loss or maybe the inability to do the job. Sometimes divorce can send the finances in a downward direction. Many thanks for sharing your notions on this blog.
To the fargo3dprinting.com administrator, Your posts are always insightful and valuable.
Thanks for your publiction. Another issue is that to be a photographer requires not only problem in taking award-winning photographs but in addition hardships in acquiring the best digital camera suited to your requirements and most especially struggles in maintaining the grade of your camera. It is very accurate and clear for those professional photographers that are in to capturing this nature’s exciting scenes : the mountains, the actual forests, the wild or perhaps the seas. Visiting these adventurous places unquestionably requires a video camera that can live up to the wild’s unpleasant conditions.
Your place is valueble for me. Thanks!…
Hello, i think that i saw you visited my weblog thus i came to ?return the favor?.I am trying to find things to enhance my site!I suppose its ok to use a few of your ideas!!
I am not real great with English but I come up this very easygoing to interpret.
Good article. It is unfortunate that over the last 10 years, the travel industry has had to deal with terrorism, SARS, tsunamis, bird flu virus, swine flu, and also the first ever true global economic downturn. Through all of it the industry has proven to be robust, resilient along with dynamic, obtaining new ways to deal with difficulty. There are continually fresh challenges and chance to which the marketplace must yet again adapt and answer.
I respect your piece of work, regards for all the good content.
Dear fargo3dprinting.com webmaster, Your posts are always well written and informative.
Useful information. Lucky me I found your site accidentally, and I am surprised why this coincidence didn’t happened earlier! I bookmarked it.
I’ve been browsing online greater than three hours today, yet I never discovered any attention-grabbing article like yours. It is pretty value enough for me. In my opinion, if all web owners and bloggers made good content as you probably did, the net will likely be a lot more useful than ever before. “Baseball is 90 percent mental. The other half is physical.” by Lawrence Peter Berra.
Today, I went to the beachfront with my kids. I found a sea shell and gave it to my 4 year old daughter and said “You can hear the ocean if you put this to your ear.” She put the shell to her ear and screamed. There was a hermit crab inside and it pinched her ear. She never wants to go back! LoL I know this is totally off topic but I had to tell someone!
I simply could not leave your web site prior to suggesting that I actually enjoyed the usual information an individual provide in your guests? Is going to be back incessantly to check out new posts
I like this weblog so much, bookmarked. “Respect for the fragility and importance of an individual life is still the mark of an educated man.” by Norman Cousins.
As soon as I discovered this site I went on reddit to share some of the love with them.
Thanks for your helpful post. Through the years, I have come to understand that the particular symptoms of mesothelioma cancer are caused by your build up associated fluid between lining on the lung and the breasts cavity. The condition may start within the chest vicinity and pass on to other body parts. Other symptoms of pleural mesothelioma cancer include fat reduction, severe deep breathing trouble, vomiting, difficulty swallowing, and irritation of the neck and face areas. It ought to be noted that some people existing with the disease tend not to experience virtually any serious indications at all.
Ponto IPTV a melhor programacao de canais IPTV do Brasil, filmes, series, futebol
My website: cartoon porn
I enjoy foregathering utile info, this post has got me even more info! .
A person essentially lend a hand to make significantly posts I would state. This is the very first time I frequented your website page and thus far? I amazed with the research you made to make this particular submit amazing. Wonderful task!
Many U.S. insurers do not provide flood insurance in some parts of the nation.
Hi fargo3dprinting.com Owner.
Valuable information. Lucky me I found your website by accident, and I’m shocked why this accident didn’t happened earlier! I bookmarked it.
WONDERFUL Post.thanks for share..extra wait .. ?
incrível este conteúdo. Gostei muito. Aproveitem e vejam este site. informações, novidades e muito mais. Não deixem de acessar para aprender mais. Obrigado a todos e até mais. 🙂
Hello there, just became aware of your blog through Google, and found that it is truly informative. I?m gonna watch out for brussels. I?ll be grateful if you continue this in future. Lots of people will be benefited from your writing. Cheers!
Someone essentially help to make seriously articles I would state. This is the first time I frequented your website page and thus far? I surprised with the research you made to make this particular publish amazing. Wonderful job!
whoah this blog is great i love reading your posts. Keep up the good work! You know, many people are searching around for this info, you could help them greatly.
I have been reading out many of your posts and i can state pretty good stuff. I will make sure to bookmark your site.
I?¦ll immediately grab your rss feed as I can not in finding your email subscription link or e-newsletter service. Do you’ve any? Kindly allow me realize in order that I could subscribe. Thanks.
When I originally commented I clicked the -Notify me when new comments are added- checkbox and now each time a comment is added I get four emails with the same comment. Is there any way you can remove me from that service? Thanks!
Does your site have a contact page? I’m having trouble locating it but, I’d like to shoot you an e-mail. I’ve got some suggestions for your blog you might be interested in hearing. Either way, great website and I look forward to seeing it improve over time.
magnificent post, very informative. I wonder why the other specialists of this sector do not notice this. You should continue your writing. I am sure, you have a huge readers’ base already!
Fantastic items from you, man. I’ve understand your stuff previous to and you’re simply extremely great. I really like what you have bought here, really like what you’re saying and the way through which you assert it. You are making it enjoyable and you still take care of to keep it wise. I cant wait to read much more from you. This is really a tremendous web site.
Perfectly written content material, appreciate it for information .
I genuinely treasure your piece of work, Great post.
Helpful information. Lucky me I found your web site by chance, and I am shocked why this accident did not took place in advance! I bookmarked it.
Thank you, I have just been searching for information about this subject for ages and yours is the best I have discovered so far. But, what about the conclusion? Are you sure about the source?
I don?t even understand how I ended up right here, but I believed this submit was good. I do not realize who you might be but definitely you are going to a well-known blogger in the event you are not already 😉 Cheers!
You need to take part in a contest for the most effective blogs on the web. I will recommend this web site!
As I web-site possessor I believe the content matter here is rattling magnificent , appreciate it for your hard work. You should keep it up forever! Good Luck.
This is very interesting, You are a very skilled blogger. I have joined your feed and look forward to seeking more of your magnificent post. Also, I’ve shared your web site in my social networks!
whoah this blog is wonderful i like studying your articles. Keep up the great work! You recognize, lots of people are searching round for this info, you could help them greatly.
Great line up. We will be linking to this great article on our site. Keep up the good writing.
Terrific post but I was wanting to know if you could write a litte more on this topic? I’d be very thankful if you could elaborate a little bit further. Thanks!
Its great as your other content : D, regards for posting.
Hi my friend! I want to say that this article is amazing, nice written and include almost all important infos. I’d like to see more posts like this.
After I initially commented I appear to have clicked on the -Notify me when new comments are added- checkbox and now every time a comment is added I get four emails with the exact same comment. There has to be a way you can remove me from that service? Cheers.
I’m amazed, I have to admit. Rarely do I come across a blog that’s both educative and amusing, and without a doubt, you have hit the nail on the head. The issue is something which too few men and women are speaking intelligently about. I am very happy that I found this in my search for something regarding this.
This is a great tip particularly to those fresh to the blogosphere. Simple but very precise information… Appreciate your sharing this one. A must read post.
I have noticed that over the course of building a relationship with real estate managers, you’ll be able to come to understand that, in each and every real estate contract, a commission rate is paid. Ultimately, FSBO sellers tend not to “save” the commission. Rather, they fight to win the commission simply by doing a good agent’s work. In this, they devote their money in addition to time to carry out, as best they will, the jobs of an representative. Those jobs include revealing the home by marketing, representing the home to buyers, making a sense of buyer emergency in order to induce an offer, arranging home inspections, handling qualification inspections with the lender, supervising repairs, and facilitating the closing.
This site is my breathing in, really wonderful pattern and perfect subject material.
I was examining some of your posts on this site and I conceive this internet site is rattling informative! Keep on posting.
I just could not go away your web site prior to suggesting that I really loved the standard info a person provide on your visitors? Is gonna be back regularly to check out new posts
I need to to thank you for this very good read!! I absolutely enjoyed every little bit of it. I’ve got you saved as a favorite to check out new stuff you post…
What i don’t understood is actually how you are not really much more well-liked than you might be right now. You are very intelligent. You realize therefore significantly relating to this subject, produced me personally consider it from so many varied angles. Its like women and men aren’t fascinated unless it?s one thing to accomplish with Lady gaga! Your own stuffs nice. Always maintain it up!
Fantastic goods from you, man. I have remember your stuff previous to and you’re just too fantastic. I actually like what you’ve bought here, really like what you’re saying and the way in which you assert it. You’re making it entertaining and you continue to care for to keep it sensible. I can not wait to read much more from you. That is really a terrific web site.
Glad to be one of many visitants on this awing internet site : D.
F*ckin? amazing things here. I?m very satisfied to look your article. Thanks a lot and i’m looking ahead to contact you. Will you please drop me a e-mail?
The subsequent time I read a weblog, I hope that it doesnt disappoint me as much as this one. I mean, I do know it was my option to read, but I truly thought youd have something fascinating to say. All I hear is a bunch of whining about one thing that you may fix for those who werent too busy searching for attention.
An outstanding share! I’ve just forwarded this on to a colleague who was conducting slightly study on this. And he in truth bought me meal just because I found it for him… lol. So allow me to reword this…. Thank YOU for that meal!! But yeah, thanks for investing some time to debate this subject matter listed here on your own Online web-site.
Great wordpress blog here.. It’s hard to find quality writing like yours these days. I really appreciate people like you! take care
Thank you a lot for sharing this with all of us you actually recognize what you are speaking about! Bookmarked. Kindly also visit my site =). We can have a hyperlink change agreement among us!
hello there and thanks on your info – I have certainly picked up something new from right here. I did alternatively expertise some technical issues the usage of this web site, as I skilled to reload the site many times previous to I may get it to load properly. I have been wondering in case your web hosting is OK? Now not that I am complaining, but sluggish loading circumstances instances will often have an effect on your placement in google and could harm your high-quality ranking if advertising and ***********|advertising|advertising|advertising and *********** with Adwords. Anyway I am adding this RSS to my e-mail and could glance out for a lot extra of your respective exciting content. Make sure you update this once more soon..
Thank you a lot for sharing this with all folks you really know what you are talking about! Bookmarked. Kindly additionally seek advice from my site =). We may have a hyperlink trade contract between us!
My brother suggested I might like this web site. He was entirely right. This post truly made my day. You can not imagine just how much time I had spent for this information! Thanks!
I haven’t checked in here for some time since I thought it was getting boring, but the last several posts are great quality so I guess I will add you back to my everyday bloglist. You deserve it my friend 🙂
I know this if off topic but I’m looking into starting my own weblog and was wondering what all is required to get setup? I’m assuming having a blog like yours would cost a pretty penny? I’m not very web smart so I’m not 100 sure. Any suggestions or advice would be greatly appreciated. Appreciate it
The following time I read a blog, I hope that it doesnt disappoint me as much as this one. I imply, I know it was my choice to learn, however I truly thought youd have something attention-grabbing to say. All I hear is a bunch of whining about one thing that you possibly can repair should you werent too busy on the lookout for attention.
You are my inhalation, I have few web logs and very sporadically run out from to post : (.
Having read this I thought it was extremely enlightening. I appreciate you taking the time and energy to put this short article together. I once again find myself spending way too much time both reading and leaving comments. But so what, it was still worthwhile!
Hi there! I could have sworn I’ve been to this blog before but after going through some of the articles I realized it’s new to me. Anyways, I’m certainly pleased I came across it and I’ll be bookmarking it and checking back regularly.
Hiya, I’m really glad I have found this information. Today bloggers publish only about gossips and web and this is actually irritating. A good website with exciting content, this is what I need. Thank you for keeping this site, I’ll be visiting it. Do you do newsletters? Can not find it.
This really answered my problem, thank you!
I blog frequently and I truly appreciate your information. The article has truly peaked my interest. I will book mark your site and keep checking for new information about once a week. I opted in for your RSS feed too.
Hi there just wanted to give you a quick heads up. The text in your article seem to be running off the screen in Opera. I’m not sure if this is a format issue or something to do with web browser compatibility but I thought I’d post to let you know. The design and style look great though! Hope you get the problem solved soon. Cheers
I blog often and I truly thank you for your content. Your article has truly peaked my interest. I am going to bookmark your website and keep checking for new information about once a week. I subscribed to your RSS feed as well.
Great post. I was checking constantly this blog and I’m impressed! Extremely helpful information specifically the last part 🙂 I care for such info a lot. I was seeking this certain information for a very long time. Thank you and best of luck.
I was recommended this blog by my cousin. I’m not sure whether this post is written by him as nobody else know such detailed about my difficulty. You’re incredible! Thanks!
Its like you learn my mind! You seem to know so much about this, such as you wrote the guide in it or something. I believe that you simply could do with some percent to power the message house a bit, however other than that, this is magnificent blog. A great read. I will certainly be back.
I’ve been surfing online greater than three hours these days, yet I by no means found any interesting article like yours. It’s pretty price sufficient for me. In my opinion, if all site owners and bloggers made good content as you did, the web can be a lot more helpful than ever before.
Hello! I’m at work browsing your blog from my new iphone 4! Just wanted to say I love reading through your blog and look forward to all your posts! Keep up the outstanding work!
I’ve been absent for some time, but now I remember why I used to love this site. Thanks , I¦ll try and check back more frequently. How frequently you update your site?
This is a very good tips especially to those new to blogosphere, brief and accurate information… Thanks for sharing this one. A must read article.
In a 2009 letter to investors, Warren Buffett wrote, “we had been paid $2.8 billion to hold our float in 2008”.
Excellent weblog right here! Also your web site rather a lot up fast! What host are you using? Can I get your associate hyperlink in your host? I desire my site loaded up as quickly as yours lol
Excellent goods from you, man. I have understand your stuff prior to and you’re just extremely excellent. I really like what you’ve obtained right here, certainly like what you’re stating and the best way in which you are saying it. You’re making it enjoyable and you continue to take care of to stay it wise. I can not wait to learn much more from you. That is really a tremendous website.
I am very happy to read this. This is the kind of manual that needs to be given and not the random misinformation that is at the other blogs. Appreciate your sharing this best doc.
Great line up. We will be linking to this great article on our site. Keep up the good writing.
It is the best time to make some plans for the future and it is time to be happy. I have read this post and if I could I want to suggest you few interesting things or suggestions. Maybe you could write next articles referring to this article. I desire to read even more things about it!
großartig aufstellen, sehr informativ. Ich überlege warum die anderen Spezialisten dieser Branche nicht bemerken. Sie sollten Ihr Schreiben fortfahren. Ich bin sicher, du hast bereits eine große Leserschaft!
Thanks for your useful article. One other problem is that mesothelioma cancer is generally the result of the breathing of materials from asbestos, which is a dangerous material. It can be commonly noticed among individuals in the structure industry with long experience of asbestos. It is caused by residing in asbestos protected buildings for long periods of time, Genetics plays a huge role, and some consumers are more vulnerable on the risk as compared to others.
I will immediately snatch your rss feed as I can’t find your e-mail subscription hyperlink or newsletter service. Do you’ve any? Kindly allow me understand in order that I may just subscribe. Thanks.
Somebody necessarily assist to make critically posts I might state. That is the first time I frequented your web page and up to now? I surprised with the research you made to make this actual submit amazing. Great job!
Hiya! I just wish to give a huge thumbs up for the good data you may have right here on this post. I will probably be coming back to your blog for extra soon.
Wow! Thank you! I permanently needed to write on my site something like that. Can I take a fragment of your post to my blog?
Do you mind if I quote a couple of your posts as long as I provide credit and sources back to your webpage? My blog site is in the very same niche as yours and my visitors would really benefit from a lot of the information you present here. Please let me know if this okay with you. Appreciate it!
You actually make it seem so easy with your presentation but I find this topic to be actually something which I think I would never understand. It seems too complex and very broad for me. I’m looking forward for your next post, I will try to get the hang of it!
Some genuinely prize content on this site, saved to favorites.
Once I initially commented I clicked the -Notify me when new comments are added- checkbox and now each time a comment is added I get 4 emails with the same comment. Is there any manner you possibly can take away me from that service? Thanks!
I really like your writing style, excellent info, thank you for putting up :D. “Let every man mind his own business.” by Miguel de Cervantes.
Heya i am for the first time here. I found this board and I find It really useful & it helped me out much. I hope to give something back and aid others like you aided me.
F*ckin? tremendous things here. I am very glad to see your article. Thanks a lot and i’m looking forward to contact you. Will you kindly drop me a e-mail?
Fortunately, there is a new registrar cheap domain names from $0.99
Namecheap exists to help EVERYONE get, make, and achieve more online with less cost, hassle, and headaches. We offer everything you need to get online and thrive, from domains to hosting to security to specialist services and products — all with value built in.
Great prices, world-beating customer support, and extra resources come as standard. ==>> https://zeep.ly/rxViL
It?s actually a cool and helpful piece of info. I am satisfied that you shared this useful information with us. Please stay us informed like this. Thanks for sharing.
Heya i?m for the first time here. I came across this board and I find It really useful & it helped me out a lot. I hope to give something back and help others like you aided me.
There are some interesting cut-off dates on this article but I don’t know if I see all of them middle to heart. There may be some validity however I will take maintain opinion till I look into it further. Good article , thanks and we wish extra! Added to FeedBurner as nicely
Wow! This can be one particular of the most helpful blogs We’ve ever arrive across on this subject. Actually Great. I am also a specialist in this topic so I can understand your hard work.
It is the best time to make some plans for the future and it’s time to be happy. I have read this post and if I could I want to suggest you some interesting things or tips. Maybe you could write next articles referring to this article. I desire to read more things about it!
You are my inspiration , I have few blogs and sometimes run out from to brand.
Insurers may prohibit sure actions which are thought of dangerous
and subsequently excluded from coverage.
Thank you for sharing superb informations. Your web-site is very cool. I am impressed by the details that you have on this web site. It reveals how nicely you perceive this subject. Bookmarked this website page, will come back for extra articles. You, my pal, ROCK! I found simply the information I already searched all over the place and simply could not come across. What a great website.
Excellent site. A lot of helpful info here. I am sending it to some buddies ans additionally sharing in delicious. And certainly, thank you for your sweat!
Perfectly indited written content, thank you for selective information. “The bravest thing you can do when you are not brave is to profess courage and act accordingly.” by Corra Harris.
Good V I should definitely pronounce, impressed with your web site. I had no trouble navigating through all tabs as well as related information ended up being truly simple to do to access. I recently found what I hoped for before you know it at all. Quite unusual. Is likely to appreciate it for those who add forums or something, site theme . a tones way for your customer to communicate. Nice task..
excellent submit, very informative. I ponder why the other experts of this sector do not notice this. You must continue your writing. I am sure, you have a great readers’ base already!
Thanks for another informative site. Where else could I get that type of info written in such an ideal way? I’ve a project that I am just now working on, and I’ve been on the look out for such information.
I like what you guys are up also. Such intelligent work and reporting! Carry on the excellent works guys I have incorporated you guys to my blogroll. I think it will improve the value of my web site 🙂
You actually make it seem really easy along with your presentation however I in finding this topic to be actually one thing that I think I would never understand. It sort of feels too complex and very wide for me. I’m taking a look forward for your next post, I will attempt to get the hold of it!
I like this blog so much, saved to favorites.
I have discovered some new elements from your web page about pcs. Another thing I’ve always considered is that computers have become a product that each household must have for many reasons. They provide convenient ways to organize households, pay bills, shop, study, listen to music and also watch television shows. An innovative technique to complete many of these tasks is by using a laptop. These pc’s are mobile, small, robust and lightweight.
I am impressed with this internet site, very I am a big fan .
I conceive you have remarked some very interesting points, thankyou for the post.
Hi I am so thrilled I found your webpage, I really found you by error, while I was searching on Yahoo for something else, Regardless I am here now and would just like to say thank you for a marvelous post and a all round exciting blog (I also love the theme/design), I don’t have time to look over it all at the moment but I have saved it and also added your RSS feeds, so when I have time I will be back to read a great deal more, Please do keep up the awesome work.
I was studying some of your posts on this internet site and I conceive this website is real instructive! Keep on posting.
excellent post.Ne’er knew this, thankyou for letting me know.
Thanks for the auspicious writeup. It in truth was once a entertainment account it. Look complicated to far brought agreeable from you! By the way, how could we be in contact?
you are really a good webmaster. The web site loading velocity is amazing. It kind of feels that you are doing any distinctive trick. Also, The contents are masterpiece. you’ve performed a fantastic process in this matter!
You can definitely see your enthusiasm in the work you write. The arena hopes for even more passionate writers such as you who are not afraid to say how they believe. At all times go after your heart.
I have read several just right stuff here. Certainly price bookmarking for revisiting. I wonder how so much attempt you set to create this sort of wonderful informative website.
Thank you, I’ve just been looking for information about this topic for ages and yours is the best I have discovered till now. But, what about the bottom line? Are you sure about the source?
I’ll right away seize your rss feed as I can’t to find your e-mail subscription link or e-newsletter service. Do you have any? Please permit me know so that I may subscribe. Thanks.
Major thanks for the article post. Much thanks again.
My website: лучшее порно домашнее
This blog is definitely rather handy since I’m at the moment creating an internet floral website – although I am only starting out therefore it’s really fairly small, nothing like this site. Can link to a few of the posts here as they are quite. Thanks much. Zoey Olsen
Very nice post. I just stumbled upon your blog and wanted to say that I have really enjoyed browsing your blog posts. After all I’ll be subscribing to your rss feed and I hope you write again soon!
What’s Happening i am new to this, I stumbled upon this I’ve found It positively helpful and it has helped me out loads. I hope to contribute & aid other users like its aided me. Good job.
I precisely wished to say thanks once again. I do not know the things that I might have used in the absence of the ways revealed by you regarding such topic. Completely was the depressing circumstance in my opinion, nevertheless understanding this professional fashion you handled it forced me to leap with happiness. Extremely thankful for this guidance and then wish you find out what a powerful job you are doing teaching other individuals through the use of your webpage. More than likely you have never met any of us.
I’m very happy to read this. This is the kind of manual that needs to be given and not the accidental misinformation that’s at the other blogs. Appreciate your sharing this best doc.
Hello there, I discovered your website by means of Google whilst looking for a related matter, your website got here up, it appears great. I’ve bookmarked it in my google bookmarks.
Thanks for another informative site. Where else could I get that kind of information written in such an ideal way? I have a project that I am just now working on, and I’ve been on the look out for such info.
Very great post. I just stumbled upon your blog and wished to mention that I have really enjoyed surfing around your blog posts. After all I’ll be subscribing in your rss feed and I’m hoping you write once more soon!
I’ve read several good stuff here. Definitely worth bookmarking for revisiting. I surprise how much effort you put to create such a great informative website.
As a Newbie, I am continuously exploring online for articles that can be of assistance to me.
My website: любительское порно бесплатно
I as well think therefore, perfectly indited post! .
Some genuinely nice and utilitarian information on this site, as well I conceive the layout has got good features.
It’s a shame you don’t have a donate button! I’d without a doubt donate to this outstanding blog! I guess for now i’ll settle for bookmarking and adding your RSS feed to my Google account. I look forward to fresh updates and will share this blog with my Facebook group. Talk soon!
Awsome post and right to the point. I am not sure if this is really the best place to ask but do you folks have any thoughts on where to employ some professional writers? Thanks 🙂
You made some decent points there. I looked on the internet for the topic and found most guys will agree with your blog.
Awsome post and straight to the point. I am not sure if this is truly the best place to ask but do you guys have any thoughts on where to hire some professional writers? Thank you 🙂
Thanks for every other informative web site. The place else may I am getting that kind of info written in such an ideal means? I’ve a venture that I’m just now operating on, and I’ve been at the look out for such info.
Hey there! This is my first visit to your blog! We are a collection of volunteers and starting a new project in a community in the same niche. Your blog provided us useful information to work on. You have done a wonderful job!
Great beat ! I would like to apprentice while you amend your site, how can i subscribe for a weblog web site? The account aided me a acceptable deal. I had been tiny bit familiar of this your broadcast provided shiny transparent idea
Hey! I know this is kind of off topic but I was wondering if you knew where I could locate a captcha plugin for my comment form? I’m using the same blog platform as yours and I’m having trouble finding one? Thanks a lot!
Very interesting topic, thanks for posting.
Interesting blog! Is your theme custom made or did you download it from somewhere? A theme like yours with a few simple adjustements would really make my blog jump out. Please let me know where you got your design. Thanks
Heya i’m for the first time here. I found this board and I find It really useful & it helped me out much. I hope to give something back and help others like you aided me.
I have been exploring for a little for any high-quality articles or blog posts on this sort of area . Exploring in Yahoo I at last stumbled upon this web site. Reading this information So i’m happy to convey that I’ve a very good uncanny feeling I discovered just what I needed. I most certainly will make sure to do not forget this web site and give it a look on a constant basis.
I have been surfing on-line greater than three hours today, yet I by no means discovered any interesting article like yours. It is beautiful price sufficient for me. Personally, if all site owners and bloggers made good content as you probably did, the internet might be a lot more useful than ever before. “It’s all right to have butterflies in your stomach. Just get them to fly in formation.” by Dr. Rob Gilbert.
naturally like your website but you have to test the spelling on quite a few of your posts. A number of them are rife with spelling problems and I in finding it very bothersome to tell the truth on the other hand I’ll surely come back again.
I?¦ve learn a few excellent stuff here. Definitely worth bookmarking for revisiting. I wonder how so much effort you set to make the sort of great informative web site.
Thanks for the sensible critique. Me & my neighbor were just preparing to do a little research about this. We got a grab a book from our area library but I think I learned more from this post. I am very glad to see such wonderful info being shared freely out there.
I have been surfing on-line greater than 3 hours today, but I never discovered any fascinating article like yours. It’s lovely value sufficient for me. In my opinion, if all website owners and bloggers made excellent content as you probably did, the internet will probably be much more useful than ever before. “No one has the right to destroy another person’s belief by demanding empirical evidence.” by Ann Landers.
You really make it seem so easy along with your presentation however I in finding this topic to be actually one thing that I feel I would never understand. It seems too complex and very wide for me. I am looking forward for your next publish, I will attempt to get the grasp of it!
you’ve a terrific weblog right here! would you wish to make some invite posts on my blog?
Absolutely composed content, Really enjoyed examining.
A lot of blog writers nowadays yet just a few have blog posts worth spending time on reviewing.
My website: секс учитель
Useful info. Lucky me I found your website by chance, and I’m surprised why this coincidence didn’t took place in advance! I bookmarked it.
I haven’t checked in here for some time since I thought it was getting boring, but the last several posts are good quality so I guess I’ll add you back to my daily bloglist. You deserve it my friend 🙂
I carry on listening to the news bulletin talk about getting boundless online grant applications so I have been looking around for the top site to get one. Could you tell me please, where could i acquire some?
Hello! I just would like to give a huge thumbs up for the great info you have here on this post. I will be coming back to your blog for more soon.
Useful information. Fortunate me I found your web site unintentionally, and I am stunned why this coincidence did not happened in advance! I bookmarked it.
As a Newbie, I am always searching online for articles that can help me. Thank you
My website: пьяный секс
We are a gaggle of volunteers and starting a new scheme in our community. Your site provided us with useful information to paintings on. You have performed an impressive process and our entire neighborhood might be grateful to you.
of course like your website however you need to check the spelling on quite a few of your posts. A number of them are rife with spelling problems and I in finding it very troublesome to tell the truth nevertheless I will surely come back again.
I really appreciate this post. I’ve been looking all over for this! Thank goodness I found it on Bing. You’ve made my day! Thanks again!
WONDERFUL Post.thanks for share..extra wait .. ?
F*ckin’ awesome issues here. I’m very satisfied to look your article. Thank you so much and i’m taking a look ahead to contact you. Will you please drop me a mail?
You have observed very interesting points! ps nice site. “Ask me no questions, and I’ll tell you no fibs.” by Oliver Goldsmith.
Fantastic website you have here but I was wanting to know if you knew of any user discussion forums that cover the same topics talked about here? I’d really love to be a part of community where I can get advice from other knowledgeable individuals that share the same interest. If you have any suggestions, please let me know. Thanks!
Its such as you read my mind! You appear to know a lot about this, such as you wrote the e-book in it or something. I think that you could do with a few percent to force the message house a little bit, however instead of that, this is great blog. An excellent read. I will certainly be back.
Merci pour les grands écrire . Je suis étude ce sujet pour un jour. Les marchandises et détails que vous précisez, je n’étais pas au courant . Je pourrait être suivant votre blog maintenant et avec un peu de chance vous pouvez en plus pensées et idées.
It?s actually a great and helpful piece of information. I am glad that you shared this helpful information with us. Please keep us up to date like this. Thanks for sharing.
Hello, you used to write great, but the last few posts have been kinda boring… I miss your great writings. Past few posts are just a little out of track! come on!
I have read some good stuff here. Definitely worth bookmarking for revisiting. I surprise how much effort you put to make such a wonderful informative site.
Hello.This article was really remarkable, especially because I was looking for thoughts on this matter last Monday.
You are my intake, I possess few blogs and rarely run out from to brand.
It’s hard to find knowledgeable people on this topic, but you sound like you know what you’re talking about! Thanks
hi!,I really like your writing so so much! percentage we keep in touch extra approximately your post on AOL? I need an expert on this area to unravel my problem. May be that’s you! Taking a look forward to look you.
Respect to website author, some excellent entropy.
I?¦ll right away grab your rss feed as I can’t to find your email subscription hyperlink or newsletter service. Do you’ve any? Kindly allow me know so that I may just subscribe. Thanks.
Valuable information. Lucky me I found your site by accident, and I am shocked why this accident didn’t happened earlier! I bookmarked it.
At this time it sounds like WordPress is the best blogging platform available right now. (from what I’ve read) Is that what you’re using on your blog?
Good day! Do you know if they make any plugins to help with Search Engine Optimization? I’m trying to get my blog to rank for some targeted keywords but I’m not seeing very good results. If you know of any please share. Appreciate it!
I am not rattling great with English but I line up this rattling easy to interpret.
I as well think hence, perfectly composed post! .
Its wonderful as your other posts : D, appreciate it for posting.
Many thanks for sharing these kind of wonderful blogposts. In addition, the perfect travel as well as medical insurance program can often ease those fears that come with vacationing abroad. Any medical crisis can soon become very expensive and that’s absolute to quickly decide to put a financial impediment on the family finances. Having in place the ideal travel insurance bundle prior to setting off is definitely worth the time and effort. Cheers
Allgemein lerne ich Artikel nicht in Blogs, allerdings ich möchte sagen, dass dieser Artikel sehr gezwungen mich auszuchecken und so zu tun! Dein Schreibstil Stil hat mich überrascht. Danke, sehr großartig Artikel.
hcq in canada
I’m still learning from you, but I’m trying to reach my goals. I certainly liked reading everything that is posted on your blog.Keep the information coming. I loved it!
Good blog! I truly love how it is easy on my eyes and the data are well written. I am wondering how I could be notified whenever a new post has been made. I have subscribed to your feed which must do the trick! Have a nice day!
My partner and I absolutely love your blog and find nearly all of your post’s to be just what I’m looking for. Do you offer guest writers to write content for yourself? I wouldn’t mind producing a post or elaborating on some of the subjects you write regarding here. Again, awesome site!
I believe other website owners should take this site as an example , very clean and excellent user friendly style and design.
You have remarked very interesting points! ps nice site.
Have you ever thought about publishing an e-book or guest authoring on other blogs? I have a blog centered on the same subjects you discuss and would love to have you share some stories/information. I know my subscribers would enjoy your work. If you are even remotely interested, feel free to shoot me an e-mail.
Amazing blog! Do you have any recommendations for aspiring writers? I’m hoping to start my own website soon but I’m a little lost on everything. Would you advise starting with a free platform like WordPress or go for a paid option? There are so many choices out there that I’m totally overwhelmed .. Any recommendations? Thank you!
I don’t unremarkably comment but I gotta say appreciate it for the post on this amazing one : D.
Hello my friend! I want to say that this post is awesome, great written and come with almost all significant infos. I would like to see extra posts like this .
Some truly quality blog posts on this internet site, bookmarked.
This design is steller! You certainly know how to keep a reader entertained. Between your wit and your videos, I was almost moved to start my own blog (well, almost…HaHa!) Great job. I really enjoyed what you had to say, and more than that, how you presented it. Too cool!
Hello there, You’ve done an excellent job. I’ll definitely digg it and personally recommend to my friends. I am confident they will be benefited from this website.
Hello there, You’ve done a fantastic job. I’ll definitely digg it and personally recommend to my friends. I am sure they’ll be benefited from this web site.
I really like your blog.. very nice colors & theme. Did you design this website yourself or did you hire someone to do it for you? Plz respond as I’m looking to construct my own blog and would like to find out where u got this from. cheers
Great ?V I should definitely pronounce, impressed with your site. I had no trouble navigating through all tabs as well as related info ended up being truly simple to do to access. I recently found what I hoped for before you know it in the least. Quite unusual. Is likely to appreciate it for those who add forums or anything, site theme . a tones way for your customer to communicate. Excellent task..
I like what you guys are up also. Such intelligent work and reporting! Carry on the superb works guys I have incorporated you guys to my blogroll. I think it’ll improve the value of my website :).
I got what you mean , regards for posting.Woh I am glad to find this website through google. “Since the Exodus, freedom has always spoken with a Hebrew accent.” by Heinrich Heine.
I love your blog.. very nice colors & theme. Did you create this website yourself? Plz reply back as I’m looking to create my own blog and would like to know wheere u got this from. thanks
Magnificent site. Plenty of useful info here. I am sending it to a few friends ans also sharing in delicious. And certainly, thanks for your effort!
Lovely blog! I am loving it!! Will come back again. I am taking your feeds also.
You are a very capable individual!
I’ll immediately grab your rss as I can not find your e-mail subscription link or newsletter service. Do you’ve any? Kindly let me know so that I could subscribe. Thanks.
Some genuinely great info , Sword lily I observed this.
Wow that was strange. I just wrote an very long comment but after I clicked submit my comment didn’t show up. Grrrr… well I’m not writing all that over again. Anyways, just wanted to say great blog!
I likewise think hence, perfectly written post! .
Keep working ,splendid job!
Do you mind if I quote a few of your articles as long as I provide credit and sources back to your webpage? My blog is in the very same niche as yours and my visitors would truly benefit from a lot of the information you provide here. Please let me know if this ok with you. Thanks!
hey there and thank you in your information – I’ve definitely picked up anything new from right here. I did however experience a few technical issues using this site, as I experienced to reload the website many occasions previous to I could get it to load correctly. I were wondering in case your web host is OK? Not that I’m complaining, however sluggish loading cases instances will often impact your placement in google and could harm your high quality rating if ads and ***********|advertising|advertising|advertising and *********** with Adwords. Anyway I am including this RSS to my e-mail and can glance out for a lot more of your respective exciting content. Ensure that you update this once more soon..
I always was concerned in this topic and stock still am, appreciate it for putting up.
This site is mostly a walk-via for all of the info you wished about this and didn’t know who to ask. Glimpse right here, and also you’ll undoubtedly uncover it.
Just what I was searching for, thanks for putting up.
This is really interesting, You’re a very skilled blogger. I have joined your feed and look forward to seeking more of your wonderful post. Also, I’ve shared your site in my social networks!
Good site! I really love how it is easy on my eyes and the data are well written. I’m wondering how I might be notified when a new post has been made. I’ve subscribed to your RSS feed which must do the trick! Have a great day!
Hello my family member! I wish to say that this article is awesome, nice written and include almost all vital infos. I would like to see more posts like this .
I’ve been exploring for a little for any high-quality articles or blog posts on this sort of area . Exploring in Yahoo I at last stumbled upon this web site. Reading this information So i’m happy to convey that I have a very good uncanny feeling I discovered just what I needed. I most certainly will make sure to do not forget this web site and give it a glance on a constant basis.
Hello there! I know this is kinda off topic but I was wondering if you knew where I could find a captcha plugin for my comment form? I’m using the same blog platform as yours and I’m having difficulty finding one? Thanks a lot!
It’s actually a nice and useful piece of info. I’m satisfied that you simply shared this useful information with us. Please keep us informed like this. Thanks for sharing.
It¦s really a great and helpful piece of info. I¦m happy that you just shared this useful information with us. Please keep us informed like this. Thank you for sharing.
When I originally commented I clicked the “Notify me when new comments are added” checkbox and now each time a comment is added I get three e-mails with the same comment. Is there any way you can remove people from that service? Cheers!
You have observed very interesting details! ps nice website . “Justice is the truth in action.” by Jeseph Joubert.
Some truly nice and utilitarian information on this internet site, as well I believe the pattern has got wonderful features.
I really appreciate this post. I have been looking everywhere for this! Thank goodness I found it on Bing. You’ve made my day! Thanks again
Good V I should certainly pronounce, impressed with your web site. I had no trouble navigating through all the tabs as well as related info ended up being truly simple to do to access. I recently found what I hoped for before you know it in the least. Reasonably unusual. Is likely to appreciate it for those who add forums or anything, website theme . a tones way for your customer to communicate. Excellent task..
Very great post. I just stumbled upon your blog and wanted to say that I have truly loved surfing around your weblog posts. After all I’ll be subscribing on your rss feed and I’m hoping you write again soon!
I like the valuable info you supply in your articles. I will bookmark your blog and test again here frequently. I am rather certain I’ll be told lots of new stuff right right here! Good luck for the following!
I was wondering if you ever thought of changing the layout of your site? Its very well written; I love what youve got to say. But maybe you could a little more in the way of content so people could connect with it better. Youve got an awful lot of text for only having 1 or 2 images. Maybe you could space it out better?
Hey very nice site!! Man .. Excellent .. Amazing .. I’ll bookmark your site and take the feeds also…I’m happy to find numerous useful info here in the post, we need work out more techniques in this regard, thanks for sharing. . . . . .
I am not sure where you are getting your info, but great topic. I needs to spend some time learning more or understanding more. Thanks for great information I was looking for this info for my mission.
You are my intake, I have few blogs and occasionally run out from post :). “He who controls the past commands the future. He who commands the future conquers the past.” by George Orwell.
Some truly interesting points you have written.Aided me a lot, just what I was looking for : D.
Once I originally commented I clicked the -Notify me when new feedback are added- checkbox and now every time a remark is added I get 4 emails with the same comment. Is there any approach you may remove me from that service? Thanks!
It’s actually a nice and helpful piece of information. I am glad that you just shared this useful info with us. Please keep us up to date like this. Thank you for sharing.
You made some nice points there. I looked on the internet for the subject matter and found most guys will go along with with your site.
I really wanted to make a brief word to express gratitude to you for all the remarkable tips and hints you are giving out on this website. My particularly long internet look up has finally been compensated with reputable ideas to go over with my best friends. I ‘d assume that we readers actually are extremely blessed to dwell in a notable website with many outstanding professionals with very helpful advice. I feel quite lucky to have used your entire webpages and look forward to really more awesome minutes reading here. Thanks a lot once again for a lot of things.
Hi, i read your blog occasionally and i own a similar one and i was just wondering if you get a lot of spam comments? If so how do you stop it, any plugin or anything you can advise? I get so much lately it’s driving me crazy so any support is very much appreciated.
Good post. I be taught one thing more difficult on different blogs everyday. It’s going to at all times be stimulating to learn content from other writers and follow a little bit something from their store. I’d favor to use some with the content on my weblog whether or not you don’t mind. Natually I’ll give you a hyperlink on your internet blog. Thanks for sharing.
Really excellent information can be found on weblog. “There used to be a real me, but I had it surgically removed.” by Peter Sellers.
Hey, you used to write magnificent, but the last several posts have been kinda boring?K I miss your super writings. Past several posts are just a bit out of track! come on!
whoah this weblog is wonderful i really like reading your articles. Stay up the great work! You know, many individuals are searching round for this info, you could help them greatly.
When I originally commented I clicked the -Notify me when new comments are added- checkbox and now each time a comment is added I get four emails with the same comment. Is there any way you can remove me from that service? Thanks!
I think you have mentioned some very interesting points, thanks for the post.
It is truly a nice and useful piece of information. I¦m glad that you simply shared this useful information with us. Please keep us informed like this. Thanks for sharing.
You are my aspiration, I own few blogs and rarely run out from to post .
Just what I was looking for, appreciate it for putting up.
I keep listening to the news broadcast lecture about getting boundless online grant applications so I have been looking around for the finest site to get one. Could you tell me please, where could i find some?
hi!,I love your writing very a lot! share we keep in touch more approximately your post on AOL? I require a specialist in this house to unravel my problem. Maybe that’s you! Taking a look forward to look you.
I am not positive where you are getting your information, however good topic. I needs to spend a while finding out much more or figuring out more. Thanks for magnificent info I used to be searching for this info for my mission.
This blog is definitely rather handy since I’m at the moment creating an internet floral website – although I am only starting out therefore it’s really fairly small, nothing like this site. Can link to a few of the posts here as they are quite. Thanks much. Zoey Olsen
Some really wonderful information, Gladiola I found this. “We protest against unjust criticism, but we accept unearned applause.” by Jose Narosky.
http://www.candipharm.com/
Thank you for sharing excellent informations. Your site is very cool. I am impressed by the details that you¦ve on this web site. It reveals how nicely you perceive this subject. Bookmarked this website page, will come back for more articles. You, my pal, ROCK! I found simply the info I already searched everywhere and just could not come across. What a great website.
Where can I get the red alignment tool shown in the movie to keep both heads at the proper height? The tool is shown at 4:32 into the film?