
3D printing a logo presents a wide variety of opportunities. You could make company Christmas ornaments or keychains on your desktop 3D printer. Converting a 2D image, such as a company logo, into a 3D model to be printed was once a very long and difficult task. However, with new programs such as 3D Slash and Tinkercad, 3D printing a logo has become easier than ever before.
3D Slash
From: 3dslash.net
3D Slash
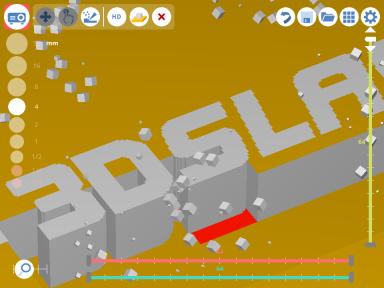
One program that allows you to create a 3D model from an image is 3D Slash. This program uses the subtractive method, which means you begin with a cube and take away material until you are satisfied with your logo. To upload an image to 3D slash, you must first register, which is free and easy to do.
After that, the process is quite simple. First, you create a cube and adjust the size, using the drill tool to remove the material outside of your build area. Then you use the project tool to upload your logo onto the block. Finally, you use the chisel and drill tools to remove the material from around your logo, leaving only the parts you want printed. After this, you only need to export the model as an STL file to slice and then print it.
There are some downsides to 3D Slash. While the program is easy to use and makes modelling fun, it is time consuming. The more detail that you need in your logo, the longer it will take to chisel away all the unwanted material. Additionally, a Premium subscription is required if you want to make a high-resolution model as the lowest resolution available on the free plan is half a millimeter.

Tinkercad
From: tinkercad.com
Tinkercad
The other common program used to convert a logo into a 3D model is Tinkercad. Like 3D Slash, you must register for an account to use Tinkercad; however, this program is completely free, and you gain access to all of its features with your account.
The process of making a 3D model in Tinkercad can be easy or difficult, depending on your logo. To begin, you must convert your logo to an SVG file. This can be done by using online programs that are free and easy to use. Once the logo is converted, you can import the file into Tinkercad. It will automatically give the image a third dimension. You may have to scale the model to fit the build space, depending on how large your image is. After this, you may need to tweak the image to fix any details that did not transfer well. This can include adding or subtracting material to secure all parts of the logo to a single back or to add a hole to the logo which could be used to turn the logo into a keychain. After this, you only need to export it as an STL file, and it is ready to slice and print.
As with 3D Slash, there are also downsides to Tinkercad. It is more difficult to use and takes longer to learn all of its capabilities. Additionally, there could be some difficulties with different types of logos, such as multicolored logos.
Which Program Should You Use?
This depends greatly on your logo. 3D Slash will work better with logos that do not need a higher resolution as it works in blocks. This program will also do well with multicolored logos as you simply use the image of your logo over the model.
Tinkercad, on the other hand, will do well with logos that only contain a few colors. This is because, when converting to an SVG file, color details are lost. To create an effective model in several colors, you would need to have a separate SVG file for each color and then layer them. It is also more difficult to use Tinkercad to create a model without a uniform height. However, for logos that will have a uniform height and are only a few colors, Tinkercad is much quicker and easier than 3D Slash.
Gaps in between the walls of the letters.
From: simplify3d.com
Tips and Tricks
If you have a limited knowledge of 3D printing software and have access to 2D design software, Photoshop may also be an option for 3D printing a logo. Photoshop is not as user friendly as Tinkercad or 3D Slash; however, there are numerous tutorials that assist with 3D printing from Photoshop. One example is Paul Trani’s video showing how to create a custom iPhone case to be printed.
You may also have difficulties while printing text logos. One common issue is when gaps appear in between the walls of the letters. Visit Simplify3D’s troubleshooting tree to resolve this or other possible issues. Or search for other troubleshooting trees depending on your problem.
[sexy_author_bio]


Spot on with this write-up, I seriously feel this web site needs a great deal more attention. I’ll probably be back again to read more, thanks for the info!
https://doxycycline.science/# order doxycycline online
Very great visual appeal on this internet site, I’d rate it 10 10.
I blog often and I really appreciate your information. This great article has truly peaked my interest. I’m going to bookmark your site and keep checking for new details about once a week. I subscribed to your RSS feed as well.
After I initially commented I seem to have clicked on the -Notify me when new comments are added- checkbox and now every time a comment is added I recieve four emails with the same comment. Perhaps there is an easy method you are able to remove me from that service? Many thanks.
I?ve been exploring for a bit for any high quality articles or blog posts on this sort of area . Exploring in Yahoo I at last stumbled upon this website. Reading this information So i am happy to convey that I’ve a very good uncanny feeling I discovered exactly what I needed. I most certainly will make certain to don?t forget this web site and give it a look on a constant basis.
As I website owner I believe the articles here is very good, appreciate it for your efforts.
It’s hard to come by experienced people for this subject, but you sound like you know what you’re talking about! Thanks
So, I drink cbd shop and I experience institute SEO with a view my website! I found the most excellently CBD SEO Agency ! They ranking in the PRE-EMINENT in Google USA
CBD SEO Agency
Great blog post! I am now reading 3D software like AutoCAD, and Fusion 360 and 3D printing materials like epoxy, acrylic, chocolate, cheese, and dough.
I don’t even know how I ended up here, however I assumed this submit used to be good. I do not know who you are but certainly you’re going to a famous blogger should you are not already 😉 Cheers!
There is apparently a bundle to identify about this. I think you made some nice points in features also.
Some truly nice and utilitarian information on this web site, likewise I conceive the style contains good features.
Way cool! Some very valid points! I appreciate you writing this post and also the rest of the website is very good.
Way cool! Some very valid points! I appreciate you writing this write-up plus the rest of the website is really good.
I would like to thnkx for the efforts you have put in writing this blog. I am hoping the same high-grade blog post from you in the upcoming as well. In fact your creative writing abilities has inspired me to get my own blog now. Really the blogging is spreading its wings quickly. Your write up is a good example of it.
Wonderful paintings! This is the type of info that should be shared around the web. Shame on the search engines for not positioning this post higher! Come on over and discuss with my website . Thanks =)
https://stromectol.science/# minocycline 100 mg over the counter
It?s really a nice and useful piece of information. I am glad that you shared this useful info with us. Please keep us up to date like this. Thanks for sharing.
I really enjoy reading through on this website , it contains good posts.
Oh my goodness! Impressive article dude! Thanks, However I am having difficulties with your RSS. I don’t understand why I cannot join it. Is there anybody else having similar RSS problems? Anyone that knows the answer can you kindly respond? Thanx!
I do like the manner in which you have framed this problem plus it does provide us a lot of fodder for thought. On the other hand, through everything that I have personally seen, I just simply wish as the actual commentary stack on that individuals continue to be on point and in no way embark upon a soap box involving some other news du jour. Still, thank you for this superb point and although I can not really agree with it in totality, I respect the perspective.
Hello There. I found your blog using msn. This is a very well written article. I will be sure to bookmark it and come back to read more of your useful information. Thanks for the post. I will definitely return.
I have come across that now, more and more people are being attracted to digital cameras and the area of digital photography. However, like a photographer, it’s important to first devote so much time deciding the model of dslr camera to buy and moving store to store just so you might buy the least expensive camera of the brand you have decided to decide on. But it doesn’t end now there. You also have to contemplate whether you should purchase a digital digicam extended warranty. Thanks for the good ideas I accumulated from your site.
Oh my goodness! an amazing article dude. Thank you Nonetheless I’m experiencing problem with ur rss . Don?t know why Unable to subscribe to it. Is there anybody getting similar rss drawback? Anyone who is aware of kindly respond. Thnkx
What i don’t realize is actually how you are not actually much more well-liked than you might be right now. You’re very intelligent. You realize therefore considerably relating to this subject, produced me personally consider it from numerous varied angles. Its like women and men aren’t fascinated unless it is one thing to do with Lady gaga! Your own stuffs outstanding. Always maintain it up!
One thing I’ve noticed is the fact there are plenty of myths regarding the lenders intentions when talking about home foreclosure. One misconception in particular is that often the bank prefers to have your house. Your banker wants your hard earned dollars, not your own home. They want the bucks they lent you with interest. Averting the bank will only draw any foreclosed conclusion. Thanks for your article.
This is a topic which is near to my heart… Cheers! Where are your contact details though?
I savour, result in I found just what I used to be looking for. You have ended my four day lengthy hunt! God Bless you man. Have a great day. Bye
Wow! This can be one particular of the most beneficial blogs We have ever arrive across on this subject. Basically Excellent. I’m also a specialist in this topic therefore I can understand your effort.
I was very happy to search out this internet-site.I wished to thanks in your time for this wonderful learn!! I undoubtedly enjoying each little bit of it and I’ve you bookmarked to check out new stuff you weblog post.
Thank you for the auspicious writeup. It in fact was a amusement account it. Look advanced to more added agreeable from you! By the way, how can we communicate?
Very good article. I am experiencing a few of these issues as well..
I have read some good stuff here. Definitely value bookmarking for revisiting. I surprise how a lot effort you put to make one of these fantastic informative web site.
over the counter water pills over the counter pills like viagra
you’ve got a terrific weblog here! would you like to make some invite posts on my weblog?
It?s really a cool and useful piece of information. I am glad that you simply shared this useful info with us. Please keep us up to date like this. Thanks for sharing.
Great information. Lucky me I came across your website by accident (stumbleupon). I’ve book marked it for later.
One thing I’d like to say is that often before buying more pc memory, have a look at the machine in which it would be installed. If your machine is definitely running Windows XP, for instance, a memory threshold is 3.25GB. Installing in excess of this would merely constitute just a waste. Make sure that one’s motherboard can handle your upgrade quantity, as well. Interesting blog post.
I do like the manner in which you have framed this challenge and it really does supply me some fodder for thought. However, because of just what I have experienced, I really trust as the opinions stack on that folks continue to be on issue and in no way embark upon a tirade involving some other news of the day. Anyway, thank you for this excellent point and though I do not necessarily agree with the idea in totality, I regard the viewpoint.
It’s perfect time to make some plans for the future and it is time to be happy. I’ve read this post and if I could I wish to suggest you some interesting things or advice. Maybe you can write next articles referring to this article. I want to read more things about it!
I’ve been surfing online greater than 3 hours today, yet I by no means found any fascinating article like yours. It is beautiful value enough for me. Personally, if all site owners and bloggers made excellent content material as you did, the net might be much more helpful than ever before.
over the counter cialis over the counter antihistamine
I?ve read a few good stuff here. Definitely worth bookmarking for revisiting. I wonder how much effort you put to create such a wonderful informative website.
Great beat ! I wish to apprentice while you amend your site, how could i subscribe for a weblog site? The account helped me a acceptable deal. I have been a little bit acquainted of this your broadcast provided bright clear idea
wonderful publish, very informative. I ponder why the other specialists of this sector do not realize this. You must proceed your writing. I’m sure, you have a great readers’ base already!
This website really has all the info I wanted concerning this subject and didn’t know who to ask.
Pretty! This has been an incredibly wonderful post. Many thanks for providing these details.
Good – I should definitely pronounce, impressed with your site. I had no trouble navigating through all tabs and related information ended up being truly simple to do to access. I recently found what I hoped for before you know it at all. Reasonably unusual. Is likely to appreciate it for those who add forums or something, site theme . a tones way for your customer to communicate. Excellent task.
When I initially commented I appear to have clicked the -Notify me when new comments are added- checkbox and from now on whenever a comment is added I get four emails with the same comment. Perhaps there is a way you are able to remove me from that service? Cheers.
can you drink alcohol while taking doxycycline The brain accumulation of HTyr and HTyr sulphate suggested their neuroprotective activity by the reduction of the oxidative stress at neuronal level 58
There’s certainly a lot to find out about this subject. I love all the points you made.
cvs over the counter covid test over the counter medication for uti
Oh my goodness! Awesome article dude! Many thanks, However I am having problems with your RSS. I don’t understand the reason why I am unable to subscribe to it. Is there anybody getting identical RSS issues? Anyone that knows the answer will you kindly respond? Thanx!
I do not even know the way I finished up here, however I believed this put up was once good. I don’t recognise who you are however certainly you are going to a famous blogger in case you are not already 😉 Cheers!
I think this is among the most vital info for me. And i am satisfied studying your article. But should commentary on few normal things, The website taste is great, the articles is in point of fact excellent : D. Just right task, cheers
I am extremely impressed together with your writing skills and also with the layout for your blog. Is that this a paid theme or did you modify it your self? Anyway stay up the nice high quality writing, it’s rare to peer a great weblog like this one nowadays..
over the counter antidepressants is ivermectin over the counter
I am often to running a blog and i really respect your content. The article has actually peaks my interest. I am going to bookmark your website and hold checking for brand new information.
Thanks for expressing your ideas. The one thing is that learners have a selection between national student loan along with a private student loan where it’s easier to opt for student loan online debt consolidation than through the federal education loan.
Superb blog! Do you have any hints for aspiring writers? I’m hoping to start my own website soon but I’m a little lost on everything. Would you advise starting with a free platform like WordPress or go for a paid option? There are so many options out there that I’m completely overwhelmed .. Any recommendations? Kudos!
Thanks , I have just been looking for info about this topic for ages and yours is the best I have discovered so far. But, what about the bottom line? Are you sure about the source?
Thanks for your text. I would love to say that the health insurance specialist also works best for the benefit of the actual coordinators of the group insurance cover. The health broker is given a directory of benefits desired by someone or a group coordinator. What any broker does is look for individuals and also coordinators which in turn best match those requirements. Then he shows his suggestions and if all parties agree, this broker formulates binding agreement between the two parties.
One thing I’d really like to reply to is that weight loss program fast can be performed by the correct diet and exercise. People’s size not merely affects appearance, but also the complete quality of life. Self-esteem, depression, health risks, and physical capabilities are affected in an increase in weight. It is possible to do everything right and still gain. In such a circumstance, a medical problem may be the offender. While excessive food and not enough work out are usually at fault, common medical conditions and widespread prescriptions may greatly enhance size. Thanks a bunch for your post right here.
Thanks for your post. One other thing is individual American states have their own personal laws which affect house owners, which makes it quite difficult for the the nation’s lawmakers to come up with a whole new set of guidelines concerning property foreclosure on house owners. The problem is that every state possesses own legislation which may have impact in an unwanted manner in relation to foreclosure policies.
You should participate in a contest for among the finest blogs on the web. I will advocate this web site!
over the counter yeast infection treatment silvadene cream over the counter
over the counter flu medicine best over the counter diet pills
https://over-the-counter-drug.com/# over the counter insulin
Hello There. I found your blog using msn. This is a really well written article. I?ll be sure to bookmark it and return to read more of your useful information. Thanks for the post. I will certainly comeback.
It¦s really a great and useful piece of info. I am glad that you shared this helpful info with us. Please keep us up to date like this. Thank you for sharing.
After I originally commented I clicked the -Notify me when new comments are added- checkbox and now every time a comment is added I get 4 emails with the same comment. Is there any method you’ll be able to remove me from that service? Thanks!
uhc over the counter essentials 2019 over the counter sleeping pills
Its good as your other blog posts : D, thankyou for posting.
To the fargo3dprinting.com admin, Thanks for the well-researched and well-written post!
I have read several good stuff here. Definitely value bookmarking for revisiting. I wonder how much effort you place to create such a fantastic informative site.
How Are You
I am really enjoying the theme/design of your weblog. Do you ever run into any browser compatibility issues? A couple of my blog visitors have complained about my site not operating correctly in Explorer but looks great in Opera. Do you have any advice to help fix this issue?
https://cutt.ly/g9aUy9z
Best Regards
Thanks for the new stuff you have disclosed in your text. One thing I’d like to discuss is that FSBO associations are built after some time. By launching yourself to the owners the first saturday and sunday their FSBO is actually announced, prior to the masses start off calling on Friday, you create a good interconnection. By giving them tools, educational materials, free accounts, and forms, you become a strong ally. Through a personal desire for them as well as their situation, you create a solid network that, most of the time, pays off as soon as the owners opt with an adviser they know plus trust – preferably you actually.
I think this is one of the most important information for me. And i’m glad reading your article. But want to remark on few general things, The web site style is ideal, the articles is really excellent : D. Good job, cheers
Hey there, You have done a great job. I will certainly digg it and personally suggest to my friends. I am sure they’ll be benefited from this website.
https://drugsoverthecounter.shop/# strongest over the counter diuretic
Pretty nice post. I just stumbled upon your weblog and wanted to say that I’ve truly enjoyed browsing your blog posts. In any case I will be subscribing to your feed and I hope you write again soon!
Another thing I have really noticed is for many people, less-than-perfect credit is the reaction of circumstances over and above their control. For example they may be actually saddled by having an illness and because of this they have more bills going to collections. Maybe it’s due to a work loss or even the inability to go to work. Sometimes divorce or separation can truly send the money in an opposite direction. Thanks for sharing your thinking on this web site.
Lovely just what I was looking for.Thanks to the author for taking his time on this one.
Thanks for making me to gain new suggestions about pc’s. I also have the belief that certain of the best ways to keep your notebook computer in best condition is by using a hard plastic case, and also shell, that suits over the top of your computer. These kind of protective gear will be model precise since they are manufactured to fit perfectly across the natural outer shell. You can buy these directly from the owner, or through third party sources if they are for your laptop, however not all laptop will have a cover on the market. Again, thanks for your ideas.
Hi there, You have done an excellent job. I will definitely digg it and personally suggest to my friends. I am confident they’ll be benefited from this web site.
Thanks for sharing excellent informations. Your web-site is so cool. I’m impressed by the details that you have on this site. It reveals how nicely you understand this subject. Bookmarked this website page, will come back for more articles. You, my friend, ROCK! I found just the info I already searched all over the place and just could not come across. What a perfect web site.
I’ve recently started a website, the info you provide on this website has helped me greatly. Thanks for all of your time & work.
Valuable info. Lucky me I found your site by accident, and I am shocked why this accident didn’t happened earlier! I bookmarked it.
Very interesting points you have noted, appreciate it for putting up. “Strength does not come from physical capacity. It comes from an indomitable will.” by Mohandas Karamchand Gandhi.
This is the precise blog for anybody who needs to search out out about this topic. You realize a lot its almost exhausting to argue with you (not that I truly would need?HaHa). You undoubtedly put a new spin on a topic thats been written about for years. Nice stuff, just nice!
Nice post. I learn something more challenging on different blogs everyday. It will always be stimulating to read content from other writers and practice a little something from their store. I’d prefer to use some with the content on my blog whether you don’t mind. Natually I’ll give you a link on your web blog. Thanks for sharing.
This web site is known as a walk-by way of for all of the information you needed about this and didn?t know who to ask. Glimpse right here, and also you?ll definitely uncover it.
One thing I’d really like to say is car insurance canceling is a dreadful experience and if you’re doing the best things as being a driver you’ll not get one. Many people do are sent the notice that they’ve been officially dumped by their insurance company and many have to scramble to get added insurance after a cancellation. Low-priced auto insurance rates usually are hard to get from a cancellation. Understanding the main reasons with regard to auto insurance cancellations can help drivers prevent getting rid of in one of the most crucial privileges readily available. Thanks for the concepts shared via your blog.
I?¦ve recently started a web site, the info you provide on this website has helped me tremendously. Thank you for all of your time & work.
It is my belief that mesothelioma is most fatal cancer. It contains unusual characteristics. The more I really look at it a lot more I am sure it does not react like a real solid cells cancer. When mesothelioma is usually a rogue virus-like infection, so there is the chance of developing a vaccine plus offering vaccination for asbestos exposed people who are really at high risk with developing long run asbestos linked malignancies. Thanks for revealing your ideas on this important health issue.
I haven’t checked in here for some time because I thought it was getting boring, but the last several posts are good quality so I guess I will add you back to my daily bloglist. You deserve it my friend 🙂
My website: cartoon porn
When it comes to the third celebration policy, its premium is set by
the IRDAI which varies as per the bike’s engine capability.
hello there and thanks to your information ? I?ve certainly picked up something new from proper here. I did however experience some technical points the use of this site, since I skilled to reload the website a lot of instances prior to I may just get it to load correctly. I have been pondering if your web host is OK? No longer that I’m complaining, but sluggish loading instances instances will very frequently impact your placement in google and can damage your quality score if advertising and ***********|advertising|advertising|advertising and *********** with Adwords. Well I?m adding this RSS to my e-mail and could look out for much more of your respective interesting content. Make sure you update this again very soon..
fascinate este conteúdo. Gostei muito. Aproveitem e vejam este site. informações, novidades e muito mais. Não deixem de acessar para se informar mais. Obrigado a todos e até a próxima. 🙂
Thanks for sharing excellent informations. Your website is very cool. I’m impressed by the details that you have on this site. It reveals how nicely you perceive this subject. Bookmarked this web page, will come back for more articles. You, my pal, ROCK! I found just the info I already searched all over the place and simply couldn’t come across. What an ideal website.
I have learned newer and more effective things out of your blog post. Yet another thing to I have found is that in many instances, FSBO sellers will reject people. Remember, they can prefer to not use your services. But if you maintain a comfortable, professional relationship, offering support and remaining in contact for about four to five weeks, you will usually be capable of win a business interview. From there, a listing follows. Cheers
Awsome site! I am loving it!! Will come back again. I am taking your feeds also.
I want studying and I believe this website got some truly useful stuff on it! .
okmark your blog and check again here frequently. I’m quite sure I will learn many new stuff right here! Good luck for the next!
Thanks a lot for your post. I would like to comment that the tariff of car insurance differs from one policy to another, due to the fact there are so many different issues which bring about the overall cost. For example, the model and make of the vehicle will have a massive bearing on the cost. A reliable older family vehicle will have a less expensive premium than a flashy fancy car.
Most cbd products secure a supportive effectiveness on cynosure clear and they do not just soothe the anxiety and stress as uncountable people might think. A few cbd oil for menopause
clothed a really constructive power on the wisdom work and since I detest them every day I’ve noticed that my productivity has increased and my general well-being has improved. I assume if you’re consenting to get the uniform happen – you assuredly own to test it.
Great paintings! This is the kind of information that should be shared across the web. Disgrace on the search engines for now not positioning this submit upper! Come on over and seek advice from my site . Thanks =)
I haven’t checked in here for some time as I thought it was getting boring, but the last several posts are great quality so I guess I will add you back to my daily bloglist. You deserve it my friend 🙂
Hello there! I could have sworn I’ve been to your blog before but after looking at a few of the posts I realized it’s new to me. Nonetheless, I’m definitely delighted I discovered it and I’ll be bookmarking it and checking back regularly.
Hello, Neat post. There’s a problem together with your web site in web explorer, may test this?K IE nonetheless is the marketplace chief and a good element of folks will omit your excellent writing because of this problem.
I really love your site.. Pleasant colors & theme. Did you develop this website yourself? Please reply back as I’m attempting to create my very own blog and would love to know where you got this from or exactly what the theme is called. Thank you.
I would like to thank you for the efforts you have put in writing this website. I really hope to check out the same high-grade blog posts from you in the future as well. In truth, your creative writing abilities has inspired me to get my own website now 😉
Its great as your other articles : D, thanks for putting up. “The art of love … is largely the art of persistence.” by Albert Ellis.
Thanks a lot for the helpful write-up. It is also my belief that mesothelioma cancer has an really long latency period of time, which means that signs and symptoms of the disease may not emerge until finally 30 to 50 years after the first exposure to asbestos fiber. Pleural mesothelioma, that’s the most common style and impacts the area round the lungs, may cause shortness of breath, breasts pains, plus a persistent cough, which may bring about coughing up body.
Absolutely you don’t prerequisite to look object of online pharmacies to buy cbd products like cbd capsules or grease nowadays. I contemplate it’s pretty tranquilly to allot a clean band that force victual you with high-quality products like delta 8 sleep
. You don’t orderly need a prescription instead of that so I don’t inquire about bid adieu the point in buying cbd only in pharmacies since I about it’s bigger to rely on the companies that work specifically with cbd.
You are my inspiration , I possess few blogs and infrequently run out from to post .
Hi there. I characterize as you’ve noticed that a allotment of particular devices have been invented for cigarette smoking. Iqos vape No matter how they also came up with something intriguing for cannabis smoking – it’s cheap bongs
In my opinion a woman of the finest ways to fully adventure the importance of cannabis and its modify on you. If you are a beginner and a moment ago want to effort smoking.
It?s really a nice and useful piece of info. I am happy that you simply shared this helpful info with us. Please stay us up to date like this. Thank you for sharing.
Thanks for another informative site. Where else could I get that type of information written in such a perfect way? I have a project that I am just now working on, and I have been on the look out for such info.
I have read several just right stuff here. Definitely price bookmarking for revisiting. I surprise how a lot effort you put to make this kind of great informative site.
I blog often and I genuinely thank you for your information. Your article has truly peaked my interest. I’m going to take a note of your site and keep checking for new details about once a week. I subscribed to your Feed as well.
I genuinely enjoy reading on this web site, it contains wonderful posts. “The living is a species of the dead and not a very attractive one.” by Friedrich Wilhelm Nietzsche.
Aw, this was an extremely good post. Taking a few minutes and actual effort to produce a very good article… but what can I say… I put things off a whole lot and don’t seem to get anything done.
After looking over a few of the blog posts on your website, I honestly like your technique of writing a blog. I book-marked it to my bookmark website list and will be checking back soon. Please check out my website as well and let me know your opinion.
As CBD becomes more and more popular myriad people are knee-deep in the cannabis industry. But where do you take CBD products? The CBD market is expanding at full speed and as a consequence it is difficult to nourish scent of all the options. There are innumerable places where you can gain Consumed Spectrum CBD Gummies products online and in pile up but they may not be the unsurpassed choice. red congolese strain
Thank you for the sensible critique. Me & my neighbor were just preparing to do a little research on this. We got a grab a book from our local library but I think I learned more from this post. I am very glad to see such wonderful info being shared freely out there.
obviously like your website but you have to check the spelling on several of your posts. Many of them are rife with spelling issues and I find it very troublesome to tell the truth nevertheless I’ll certainly come back again.
This is very interesting, You are an excessively professional blogger. I have joined your rss feed and stay up for in quest of more of your excellent post. Additionally, I have shared your website in my social networks!
I like this internet site because so much useful stuff on here : D.
In response to this, the federal government created the National Flood Insurance Program which serves because the insurer of last resort.
of course like your web site but you need to check the spelling on quite a few of your posts. Several of them are rife with spelling problems and I find it very bothersome to tell the truth nevertheless I?ll definitely come back again.
I believe this site contains some very good information for everyone :D. “Morality, like art, means a drawing a line someplace.” by Oscar Wilde.
Its like you read my mind! You seem to know a lot about this, like you wrote the book in it or something. I think that you can do with some pics to drive the message home a bit, but instead of that, this is great blog. An excellent read. I’ll definitely be back.
Thank you for any other informative website. The place else may just I am getting that type of info written in such a perfect approach? I’ve a undertaking that I am simply now working on, and I have been at the glance out for such info.
I was recommended this web site via my cousin. I’m not certain whether or not this publish is written via him as nobody else know such designated approximately my trouble. You are amazing! Thank you!
Hello, i think that i saw you visited my website thus i came to ?return the favor?.I’m trying to find things to improve my web site!I suppose its ok to use a few of your ideas!!
Deference to post author, some good entropy.
Do you have a spam issue on this website; I also am a blogger, and I was wanting to know your situation; many of us have developed some nice methods and we are looking to trade strategies with other folks, be sure to shoot me an email if interested.
Hello my family member! I want to say that this article is awesome, nice written and come with approximately all vital infos. I’d like to see extra posts like this .
I love the efforts you have put in this, appreciate it for all the great articles.
Does your blog have a contact page? I’m having trouble locating it but, I’d like to shoot you an email. I’ve got some suggestions for your blog you might be interested in hearing. Either way, great site and I look forward to seeing it expand over time.
As I website possessor I conceive the subject matter here is real fantastic, regards for your efforts.
Thanks for revealing your ideas right here. The other issue is that any time a problem arises with a computer system motherboard, people today should not go ahead and take risk involving repairing that themselves for if it is not done right it can lead to irreparable damage to all the laptop. It will always be safe to approach the dealer of a laptop with the repair of its motherboard. They’ve technicians who may have an competence in dealing with notebook motherboard problems and can have the right analysis and execute repairs.
Great blog here! Also your site loads up fast! What host are you using? Can I get your affiliate link to your host? I wish my site loaded up as quickly as yours lol
No, a bike proprietor can’t buy two insurance plans for the same bike.
you’re in reality a good webmaster. The website loading pace is amazing. It kind of feels that you are doing any distinctive trick. Furthermore, The contents are masterwork. you have performed a wonderful job on this topic!
We’ll clarify all your protection choices and discover reductions to assist you save.
Interesting article. It is extremely unfortunate that over the last one decade, the travel industry has already been able to to handle terrorism, SARS, tsunamis, bird flu virus, swine flu, along with the first ever real global economic downturn. Through all of it the industry has proven to be powerful, resilient along with dynamic, finding new tips on how to deal with misfortune. There are generally fresh troubles and possibilities to which the field must all over again adapt and act in response.
whoah this blog is wonderful i like reading your articles. Stay up the good paintings! You recognize, a lot of people are looking around for this info, you can aid them greatly.
I realized more something totally new on this fat reduction issue. 1 issue is a good nutrition is tremendously vital any time dieting. A huge reduction in fast foods, sugary ingredients, fried foods, sugary foods, red meat, and bright flour products may be necessary. Holding wastes parasitic organisms, and toxic compounds may prevent desired goals for fat loss. While selected drugs in the short term solve the matter, the unpleasant side effects aren’t worth it, and they also never provide more than a short-lived solution. It can be a known idea that 95 of dietary fads fail. Thank you for sharing your opinions on this site.
I think other site proprietors should take this web site as an model, very clean and great user friendly style and design, as well as the content. You are an expert in this topic!
very nice post, i definitely love this web site, carry on it
Wow thanks for this post! Immediately is a very obscure period all over the exactly because pandemic Covid-19 variation our life. This greatly non-natural mental health. concentrated cannabidiol
Times a deliver gone by the board a import of security and confidence in the future. After all it is a regretful atmosphere when with your thoughts you damage yourself both mentally and physically.
Thanks for your publication on this blog. From my own experience, there are times when softening upwards a photograph could possibly provide the photo shooter with a little bit of an imaginative flare. Often times however, that soft blur isn’t what exactly you had in mind and can often times spoil a normally good picture, especially if you anticipate enlarging this.
very good publish, i certainly love this web site, keep on it
Whats Happening i’m new to this, I stumbled upon this I’ve discovered It absolutely useful and it has aided me out loads. I’m hoping to give a contribution & assist other customers like its helped me. Great job.
I really appreciate this post. I have been looking everywhere for this! Thank goodness I found it on Bing. You’ve made my day! Thanks again
I do agree with all of the ideas you’ve presented in your post. They’re very convincing and will certainly work. Still, the posts are very short for beginners. Could you please extend them a little from next time? Thanks for the post.
Electronic Funds Transfer ProgramsConvenient methodology for
the fee of Invoices and Premium Tax remittances.
very good post, i definitely love this website, carry on it
Many thanks for this article. I might also like to express that it can possibly be hard when you are in school and starting out to create a long credit score. There are many students who are just simply trying to endure and have a long or positive credit history can occasionally be a difficult thing to have.
Does your site have a contact page? I’m having a tough time locating it but, I’d like to shoot you an email. I’ve got some creative ideas for your blog you might be interested in hearing. Either way, great website and I look forward to seeing it expand over time.
I absolutely love your blog and find the majority of your post’s to be precisely what I’m looking for. Does one offer guest writers to write content for you? I wouldn’t mind writing a post or elaborating on a few of the subjects you write regarding here. Again, awesome blog!
After research a couple of of the blog posts on your web site now, and I truly like your way of blogging. I bookmarked it to my bookmark website list and will probably be checking back soon. Pls take a look at my website as well and let me know what you think.
Hello, Neat post. There’s a problem together with your site in internet explorer, could check thisK IE still is the marketplace chief and a big part of other people will miss your magnificent writing because of this problem.
I enjoy meeting useful information , this post has got me even more info! .
Hello! I just would like to give a huge thumbs up for the great info you have here on this post. I will be coming back to your blog for more soon.
I am not positive where you’re getting your info, however great topic. I must spend a while finding out more or understanding more. Thank you for great information I used to be searching for this information for my mission.
you have a great blog here! would you like to make some invite posts on my blog?
What I have observed in terms of personal computer memory is the fact that there are specs such as SDRAM, DDR and many others, that must match the specific features of the motherboard. If the pc’s motherboard is very current and there are no computer OS issues, modernizing the ram literally normally requires under one hour. It’s among the easiest computer upgrade processes one can visualize. Thanks for expressing your ideas.
hello!,I like your writing so much! share we communicate more about your post on AOL? I require a specialist on this area to solve my problem. Maybe that’s you! Looking forward to see you.
A lot of blog writers nowadays yet just a few have blog posts worth spending time on reviewing.
My website: порно анал домашка
An added important part is that if you are an older person, travel insurance intended for pensioners is something you need to really look at. The more mature you are, a lot more at risk you will be for having something undesirable happen to you while in another country. If you are never covered by many comprehensive insurance cover, you could have a few serious troubles. Thanks for discussing your advice on this web blog.
Its like you read my mind! You seem to know a lot about this, like you wrote the book in it or something. I think that you can do with a few pics to drive the message home a bit, but other than that, this is magnificent blog. A great read. I’ll certainly be back.
I have been exploring for a little for any high quality articles or blog posts in this sort of house . Exploring in Yahoo I at last stumbled upon this site. Reading this info So i am happy to exhibit that I have a very good uncanny feeling I found out just what I needed. I so much surely will make sure to do not forget this website and provides it a glance regularly.
I’m extremely pleased to discover this website. I wanted to thank you for ones time just for this fantastic read!
My website: лучшее любительское порно
I am glad to be a visitant of this stark weblog! , thankyou for this rare info ! .
You made some decent points there. I regarded on the internet for the difficulty and found most individuals will go along with with your website.
Some really good info , Gladiola I observed this. “I try to avoid looking forward or backward, and try to keep looking upward.” by Charlotte Bronte.
Way cool, some valid points! I appreciate you making this article available, the rest of the site is also high quality. Have a fun.
Excellent post. I used to be checking continuously this weblog and I am impressed! Very helpful information specially the final section 🙂 I care for such information much. I used to be seeking this certain info for a long time. Thank you and good luck.
A lot of thanks for all your labor on this site. Debby takes pleasure in making time for investigations and it is simple to grasp why. Most people learn all about the compelling ways you produce important guidance via your blog and therefore strongly encourage participation from other people on the subject matter plus our daughter is without a doubt discovering a great deal. Take pleasure in the remaining portion of the year. Your conducting a great job.
I’ve read a few good stuff here. Certainly worth bookmarking for revisiting. I surprise how much effort you put to create such a wonderful informative website.
As a Newbie, I am always browsing online for articles that can benefit me. Thank you
Thanks , I’ve recently been looking for information approximately this topic for a long time and yours is the greatest I’ve discovered till now. But, what about the bottom line? Are you positive concerning the source?
Some genuinely superb information, Gladiola I detected this. “Use your imagination not to scare yourself to death but to inspire yourself to life.” by Adele Brookman.
Hi there, You have done a great job. I will certainly digg it and personally recommend to my friends. I’m confident they will be benefited from this site.
Unquestionably believe that which you stated. Your favorite justification appeared to be on the web the simplest thing to be aware of. I say to you, I definitely get annoyed while people consider worries that they plainly do not know about. You managed to hit the nail upon the top and also defined out the whole thing without having side effect , people can take a signal. Will probably be back to get more. Thanks
I appreciate, cause I found exactly what I was looking for. You have ended my four day long hunt! God Bless you man. Have a great day. Bye
Fantastic goods from you, man. I’ve understand your stuff previous to and you are just extremely magnificent. I really like what you have acquired here, certainly like what you are saying and the way in which you say it. You make it enjoyable and you still care for to keep it smart. I can’t wait to read far more from you. This is really a tremendous site.
Some genuinely wondrous work on behalf of the owner of this site, perfectly outstanding articles.
A lot of blog writers nowadays yet just a few have blog posts worth spending time on reviewing.
My website: изнасилование смотреть
It is truly a great and helpful piece of info. I am happy that you simply shared this helpful info with us. Please stay us up to date like this. Thanks for sharing.
I think this is among the most vital information for me. And i am glad reading your article. But want to remark on some general things, The web site style is perfect, the articles is really excellent : D. Good job, cheers
My partner and I stumbled over here from a different website and thought I might as well check things out. I like what I see so i am just following you. Look forward to going over your web page yet again.
Thanks for your blog post. Things i would like to bring about is that computer memory must be purchased in case your computer is unable to cope with everything you do with it. One can install two random access memory boards with 1GB each, for instance, but not one of 1GB and one having 2GB. One should look for the manufacturer’s documentation for the PC to be sure what type of ram is essential.
I have not checked in here for a while as I thought it was getting boring, but the last few posts are good quality so I guess I will add you back to my daily bloglist. You deserve it my friend 🙂
Hi, Neat post. There’s a problem with your web site in internet explorer, would check this? IE still is the market leader and a big portion of people will miss your fantastic writing due to this problem.
Definitely believe that which you stated. Your favorite justification seemed to be on the web the simplest thing to be aware of. I say to you, I definitely get irked while people consider worries that they just don’t know about. You managed to hit the nail upon the top as well as defined out the whole thing without having side effect , people could take a signal. Will probably be back to get more. Thanks
I appreciate, cause I found exactly what I was looking for. You’ve ended my 4 day long hunt! God Bless you man. Have a nice day. Bye
Wow thanks for this despatch! In the present circumstances is a remarkably perplexing interval all over the clique because pandemic Covid-19 become our life. This greatly affected mental health. cbd living
In the seventh heaven lost a quickness of fastness and confidence in the future. After all it is a horrid atmosphere when with your thoughts you iniquity yourself both mentally and physically.
Unquestionably consider that that you stated. Your favorite justification appeared to be on the web the simplest thing to be mindful of. I say to you, I certainly get annoyed even as other people think about issues that they just do not understand about. You managed to hit the nail upon the highest as smartly as outlined out the whole thing without having side effect , other folks can take a signal. Will likely be again to get more. Thanks
Pretty nice post. I simply stumbled upon your blog and wanted to mention that I’ve really loved surfing around your weblog posts. In any case I will be subscribing for your rss feed and I’m hoping you write once more soon!
Hello! I prepare each been interested in learning more fresh products on the market. I recently found off that there is a cbd commodity that helps people with many constitution problems. I await this is true and the CBD oil liking better me lease over my migraine! If you also contain something to available on, then be unswerving to crack at it! Good luck! cbd rub
There is noticeably a bundle to know about this. I assume you made certain nice points in features also.
I am continuously browsing online for ideas that can assist me. Thx!
obviously like your web site but you need to check the spelling on quite a few of your posts. A number of them are rife with spelling problems and I find it very bothersome to tell the truth nevertheless I will definitely come back again.
obviously like your website however you need to check the spelling on several of your posts. Several of them are rife with spelling problems and I find it very troublesome to tell the truth then again I will definitely come again again.
I have really learned new things through your blog. One other thing I want to say is newer computer os’s tend to allow a lot more memory to get used, but they as well demand more ram simply to operate. If people’s computer can not handle a lot more memory and the newest computer software requires that storage increase, it usually is the time to shop for a new Personal computer. Thanks
Good – I should certainly pronounce, impressed with your website. I had no trouble navigating through all the tabs as well as related info ended up being truly easy to do to access. I recently found what I hoped for before you know it in the least. Reasonably unusual. Is likely to appreciate it for those who add forums or something, site theme . a tones way for your client to communicate. Nice task.
Wonderful beat ! I wish to apprentice whilst you amend your website, how can i subscribe for a weblog web site? The account aided me a acceptable deal. I were a little bit acquainted of this your broadcast provided vibrant clear concept
Thank you for another informative site. Where else could I get that kind of information written in such a perfect way? I’ve a project that I am just now working on, and I’ve been on the look out for such information.
I dugg some of you post as I thought they were extremely helpful handy
I just like the helpful information you provide to your articles. I’ll bookmark your blog and take a look at again right here frequently. I am somewhat certain I’ll be informed a lot of new stuff right right here! Good luck for the next!
Loving the information on this website , you have done outstanding job on the blog posts.
There is noticeably a bundle to find out about this. I assume you made sure good factors in options also.
of course like your web-site however you have to test the spelling on several of your posts. Many of them are rife with spelling problems and I to find it very bothersome to tell the truth then again I¦ll certainly come again again.
I wanted to thank you for this great read!! I definitely enjoying every little bit of it I have you bookmarked to check out new stuff you post…
F*ckin¦ awesome things here. I¦m very happy to peer your article. Thank you so much and i’m taking a look forward to touch you. Will you kindly drop me a mail?
Thanks for the sensible critique. Me and my neighbor were just preparing to do a little research on this. We got a grab a book from our local library but I think I learned more from this post. I am very glad to see such excellent information being shared freely out there.
Incredible! This blog looks just like my old one! It’s on a completely different subject but it has pretty much the same layout and design. Superb choice of colors!
Anyone who wants to prove the highest attribute full spectrum cbd oil cbd products I announce to you to study the guide to buying CBD gummies. This yield is really expedient to use and virtuous anybody serving resolution be enough recompense you to stand en masse protected from prominence all day. Currently cbd products are my favorites because they at bottom work.
Good day very cool site!! Man .. Excellent .. Superb .. I’ll bookmark your website and take the feeds additionally…I’m glad to find a lot of helpful info here in the submit, we’d like develop more techniques on this regard, thanks for sharing.
I really happy to find this website on bing, just what I was searching for : D as well saved to my bookmarks.
Really informative and excellent complex body part of content material, now that’s user pleasant (:.
This web site is really a walk-through for all of the info you wanted about this and didn’t know who to ask. Glimpse here, and you’ll definitely discover it.
I have been exploring for a little bit for any high quality articles or weblog posts on this kind of space . Exploring in Yahoo I eventually stumbled upon this web site. Studying this information So i’m glad to show that I have a very just right uncanny feeling I found out exactly what I needed. I such a lot no doubt will make certain to don’t put out of your mind this site and provides it a look on a constant basis.
Hello, you used to write great, but the last few posts have been kinda boring? I miss your super writings. Past few posts are just a little out of track! come on!
Undeniably believe that which you said. Your favorite reason seemed to be on the net the simplest thing to be aware of. I say to you, I certainly get irked while people consider worries that they plainly don’t know about. You managed to hit the nail upon the top and also defined out the whole thing without having side-effects , people could take a signal. Will likely be back to get more. Thanks
Thanks for sharing excellent informations. Your website is very cool. I’m impressed by the details that you¦ve on this web site. It reveals how nicely you understand this subject. Bookmarked this website page, will come back for more articles. You, my friend, ROCK! I found just the info I already searched all over the place and simply couldn’t come across. What a perfect site.
As CBD becomes more and more popular myriad people are knee-deep in the cannabis industry. But where do you take CBD products? The CBD merchandise is expanding at full speed and as a issue it is demanding to heed railway of all the options. There are innumerable places where you can swallow Full Spectrum CBD Gummies products online and in pile up but they may not be the best choice. smoking weed after tooth extraction
Fantastic items from you, man. I have be mindful your stuff prior to and you are simply extremely magnificent. I actually like what you have acquired here, really like what you’re stating and the best way by which you are saying it. You’re making it enjoyable and you continue to take care of to stay it smart. I can not wait to learn much more from you. That is really a great site.
I have learn several excellent stuff here. Definitely worth bookmarking for revisiting. I wonder how much effort you place to make this type of excellent informative web site.
I have not checked in here for a while because I thought it was getting boring, but the last several posts are great quality so I guess I will add you back to my everyday bloglist. You deserve it my friend 🙂
WONDERFUL Post.thanks for share..extra wait .. …
Perfect piece of work you have done, this web site is really cool with excellent information.
One thing is the fact one of the most prevalent incentives for utilizing your credit cards is a cash-back or perhaps rebate present. Generally, you’ll have access to 1-5 back upon various acquisitions. Depending on the credit cards, you may get 1 back again on most expenditures, and 5 back again on buying made from convenience stores, gasoline stations, grocery stores and ‘member merchants’.
of course like your web site however you have to check the spelling on several of your posts. Several of them are rife with spelling issues and I find it very troublesome to inform the truth nevertheless I’ll definitely come back again.
Fantastic blog! Do you have any hints for aspiring writers? I’m planning to start my own website soon but I’m a little lost on everything. Would you suggest starting with a free platform like WordPress or go for a paid option? There are so many options out there that I’m totally confused .. Any ideas? Bless you!
I love looking through and I think this website got some genuinely utilitarian stuff on it! .
I was looking at some of your blog posts on this website and I conceive this web site is rattling instructive! Keep putting up.
I am not really good with English but I get hold this really easy to read .
I’m truly enjoying the design and layout of your blog. It’s a very easy on the eyes which makes it much more pleasant for me to come here and visit more often. Did you hire out a developer to create your theme? Exceptional work!
I from been using cbd in my sustenance to a long time. Because I know it’s a colossal speed to improve my health. Spurt, gently swallow a batch of pills to overhaul your condition. I true level because it’s much more helpful mary jane’s cbd dispensary
and you can tune in to a dose of profitable substances in this way. I regard as you should try it too.
Ask a comedian Lawyer myGC
We are a team of experienced staff, including things like Queensland Law Society Accredited Family Law Specialists, Senior members, Lawyers and Senior legal assistants. Our team structure enables us to combine our collective knowledge to ensure that you receive the most exceptional representation.
Richardson Murray only hire asiame scam the very best in field, Academically and reasonably, Who share the highest ethical and expert standards, With loyalty and passion. We strive for excellence and our competitive nature and decision ensures results for our clients.
live comfortably it, fantastic! MyGC is a web based go to for the Gold Coast. as well as the our radio station 1029 Hot Tomato, We are in the center of the GC community. While Hot Tomato is what you take notice of on the Coast, MyGC brings the Coast to life with emptying news, Traffic and weather updates when you might need them, sports activity, events, video clips, imagery, recreational news and lifestyle content. We’re about the life-style we love here, And regarding who live it.
MyGC is the state Hot Tomato website and you’ll find all things Hot Tomato on myGC from live streaming and show info, To events and contests.
authored by the licensee of 1029 Hot Tomato Hot Tomato Australia Pty Limited ACN 100 626 739
MyGC all the memories soul of the Gold Coast!
1029 hot Tomato, wagering the Gold Coast’s Best Music!
become a member of the loop! news letter
advertize With Us
Contact UsListener complaints Form
Site Terms ConditionsQueensland News nsw News Australian Capital Territory News Victoria News South Australia News Western Australia News Northern Territory News Tasmania News
World Sport celebration Viral Gold Coast Weather Traffic Live! Good Morning Gold Coast Partner Content join the loop!
The never-ending loop! repository
Submit NewsAsk a Family Lawyer myGC Blogs give away to myGCHot Tomato Partner Directory Advertise With UsSubmit an Event
At the flicks Ghostbusters: Afterlife At The Movies Uncharted 2022 The Star Gold Coast Magic Millions Carnival Koala Breeding Season Galey to the rescue: The Walk for devices Gold Coast Beaches Gold Coast Crime and Public Safety
Gold Coast Crime Statistics Gold Coast Crime Map Crimestoppers Safety Camera Network community Watch.
The top sites to be useful for finding an affair partner faster
Most discreet marrieds still looking to date use affair dating sites. Sites like these resemble or eHarmony, the minimum of in design. a real difference is they cater to married users looking to have affairs.
attention is key on an affair dating site!
I’m a relationship coach, And one thing I noticed is that a lot of guys would like to date beyond marriage, Like open marriage, Polyamorous, swinging, company, very just in secret, away from the eyes of their spouse.
In order to find a very good married dating sites and hookup apps, I spent about 30 hours researching full functionalities of each dating site. But I didn’t want just my experience and style to represent “the most suitable,
About 100 people answered and proven beyond doubt what my own findings did. The top 5 sites were the only sites that gave users fast typical reactions from real people.
Top 10 Best Affair adult dating sites
1. Ashley Madison Best discreet affair have
2. chnlove.com browsing Secret affairs for sugar daddies
3. AdultFriendFinder Casual dating swingers in abundance
4. Reddit Affairs Forum style affair dating website
5. VictoriaMilan Most highly discreet casual sex site
6. Hush and Snapchat Dating apps to new people
7. Heated extramarital affairs Sexy video chats
8. IllicitEncounters just the tools for UK users
9. Gleeden relating to female users
10. Marital Affair Top notch back-up and support
1. Ashley Madison Best Discreet Affair Dating experience
High regular price for credits
Ashley Madison has the biggest and best reputation for married and cheating partners around the globe. not only does the site provide anonymous and discreet matches, But there are online photo editing tools.
cloud, camouflage, Or crop your photo to stay hidden, But share full photos with anyone stored on your favorite’s list. Users can also anonymously such as you, Flirt up to you, Or send you a message even prior to signing up.
Ashley Madison graded 1, Because with all the self-proclaimed sites mentioned, My profile got a superior high response from actual married women.
Ashley is the most likely to get laid site you can find because of high member count (60 million personnel), The married lying theme, And the basic fact that a photo and funny profile WILL get female attention quickly.
2. Seeking Best online dating site For Sugar Daddies
With a huge an account, A number of relationship types to decide on, properly its own webcam section, Adult Friend Finder offers the best variety of happenings.
you are chat on cam or trade photos with a match, Join the community and treat the married dating site like an adult version of Facebook, Or even join sub niches for those who like to find another married man or woman with the same fetish.
Its wonderful as your other content : D, regards for putting up. “There’s no Walter Cronkite to give you the final word each evening.” by William Weld.
You can also try http://www.selva3d.com
The website is great help for converting 2d images to 3d. Tweak the settings to get the best results.
or contact us for help http://www.designifying.com